【Java 多线程并发】 AQS(Abstract Queued Synchronizer)
【Java 多线程并发】 AQS(Abstract Queued Synchronizer)
Metadata
title: 【Java 多线程并发】 AQS(Abstract Queued Synchronizer)
date: 2023-07-04 10:53
tags:
  - 行动阶段/完成
  - 主题场景/程序
  - 笔记空间/KnowladgeSpace/ProgramSpace/BasicsSpace
  - 细化主题/Java
categories:
  - Java
keywords:
  - Java
description: 【Java 多线程并发】 AQS(Abstract Queued Synchronizer)
概述
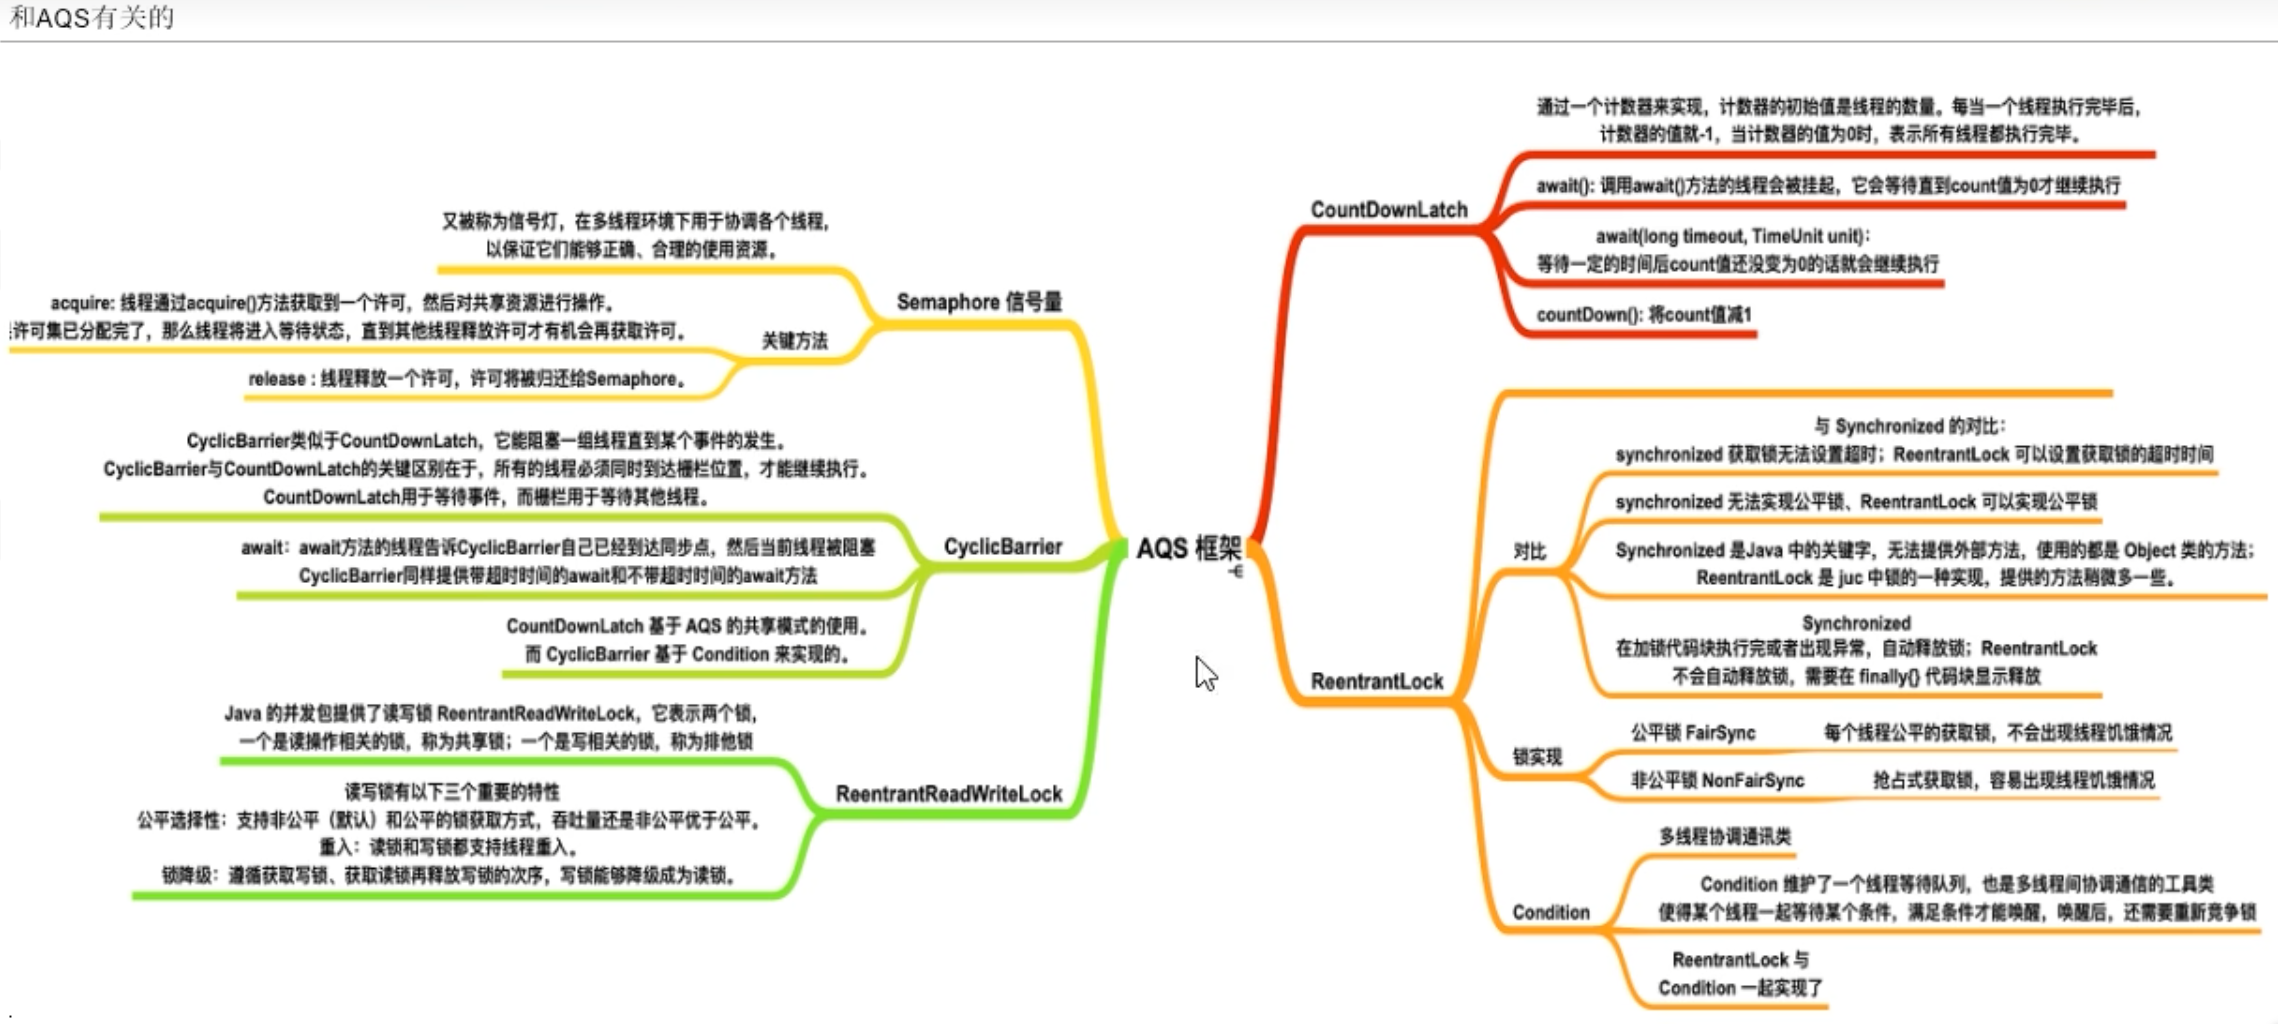
AQS(AbstractQueuedSynchronizer)是Java中用于实现同步器的抽象基类。它提供了一种基于FIFO队列的线程协作机制,可以用来构建各种类型的同步器,如锁、信号量、倒计时门栓等。
提供了两种模式的同步器:独占模式和共享模式。
核心思想
- 使用一个共享的volatile int状态变量来表示同步状态
- 通过CAS操作来实现对状态的原子更新
- LockSupport 进行唤醒等待
Node 节点
AQS的CLH队列
Lock.lock()
acquire方法 获取锁
- 调用自定义同步器的tryAcquire()尝试直接去获取资源,如果成功则直接返回;
- 没成功,则addWaiter()将该线程加入等待队列的尾部,并标记为独占模式;
- acquireQueued()使线程在等待队列中休息,有机会时(轮到自己,会被unpark())会去尝试获取资源。获取到资源后才返回。如果在整个等待过程中被中断过,则返回true,否则返回false。
- 如果线程在等待过程中被中断过,它是不响应的。只是获取资源后才再进行自我中断selfInterrupt(),将中断补上。

Lock.unlock()
release(int) 释放锁
- 用unpark()唤醒等待队列中最前边的那个未放弃线程,这里我们也用s来表示吧。
- 此时,再和acquireQueued()联系起来,s被唤醒后,进入if (p == head && tryAcquire(arg))的判断(即使p!=head也没关系,它会再进入shouldParkAfterFailedAcquire()寻找一个安全点。
- 这里既然s已经是等待队列中最前边的那个未放弃线程了,那么通过shouldParkAfterFailedAcquire()的调整,s也必然会跑到head的next结点,下一次自旋
p==head就成立啦),然后s把自己设置成head标杆结点,表示自己已经获取到资源了,acquire()也返回了

【Java 多线程并发】 AQS(Abstract Queued Synchronizer)
AQS(AbstractQueuedSynchronizer)是Java中用于实现同步器的抽象基类。它提供了一种基于FIFO队列的线程协作机制,可以用来构建各种类型的同步器,如锁、信号量、倒计时门栓等。
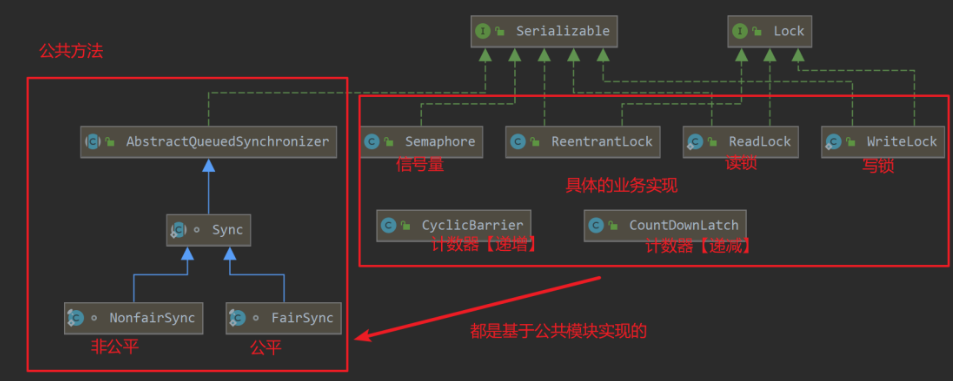
AQS提供了两种模式的同步器:独占模式和共享模式。独占模式只允许一个线程占用同步状态,如ReentrantLock就是一个独占模式的同步器。共享模式允许多个线程同时占用同步状态,如CountDownLatch和Semaphore就是共享模式的同步器。
AQS是一个非常重要的基础组件,很多并发工具和框架都是基于AQS来实现的,如ReentrantLock、CountDownLatch、Semaphore、ReentrantReadWriteLock等。了解AQS的原理和使用方法,对于深入理解Java并发编程和开发高效的多线程程序是非常有帮助的。
核心思想
AQS的核心思想是使用一个共享的volatile int状态变量来表示同步状态,通过CAS操作来实现对状态的原子更新。AQS内部维护了一个等待队列,用于存储等待获取同步状态的线程。当线程尝试获取同步状态时,如果发现状态已被其他线程占用,则会将该线程封装成一个节点,插入等待队列的尾部,然后进入自旋等待或被阻塞。当占用同步状态的线程释放状态时,AQS会从等待队列中选择一个线程唤醒,使其重新尝试获取同步状态。
引入
场景模拟
我们先来看下这样一个场景
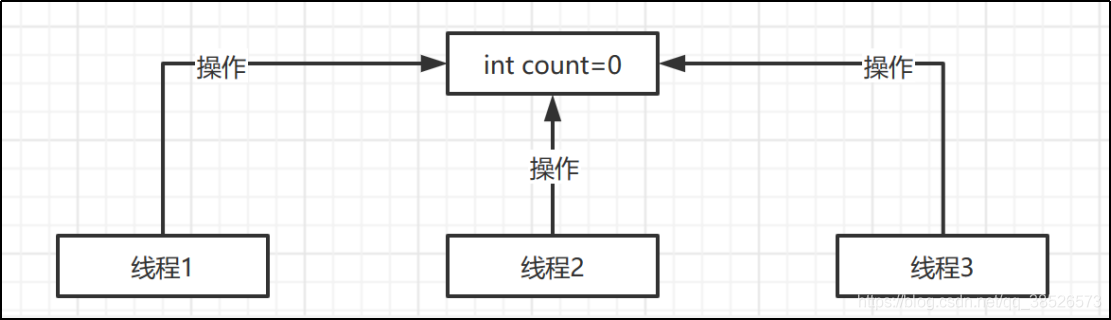
在这里我们有一个能被多个线程共享操作的资源,在这个场景中应该能看出我们的数据是不安全的,因为我们并不能保证我们的操作是原子操作对吧。基于这个场景我们通过代码来看看效果
package com.example.demo;

public class AtomicDemo {

    // 共享变量
    private static int count = 0;

    // 操作共享变量的方法
    public static void incr(){
        // 为了演示效果  休眠一下子
        try {
            Thread.sleep(1);
            count ++;
        } catch (InterruptedException e) {
            e.printStackTrace();
        }
    }

    public static void main(String[] args) throws InterruptedException {
        for (int i = 0; i < 1000 ; i++) {
            new Thread(()->AtomicDemo.incr()).start();
        }

        Thread.sleep(4000);
        System.out.println("result:" + count);
    }

}
通过执行发现,执行的结果是一个不确定的值,但总是会小于等于1000,至于原因,是因为incr() 方法不是一个原子操作。为什么不是原子操作这个咱们今天就不深究此处了.
迎合今天的主题,我们通过Lock来解决
package com.example.demo;

import java.util.concurrent.locks.Lock;
import java.util.concurrent.locks.ReentrantLock;

public class AtomicDemo {

    // 共享变量
    private static int count = 0;

    private static Lock lock = new ReentrantLock();

    // 操作共享变量的方法
    public static void incr(){
        // 为了演示效果  休眠一下子
        try {
            lock.lock();
            Thread.sleep(1);
            count ++;
        } catch (InterruptedException e) {
            e.printStackTrace();
        }finally {
            lock.unlock();
        }
    }

    public static void main(String[] args) throws InterruptedException {
        for (int i = 0; i < 1000 ; i++) {
            new Thread(()->AtomicDemo.incr()).start();
        }

        Thread.sleep(4000);
        System.out.println("result:" + count);
    }

}
然后我们运行发现结果都是 1000了,这也就是1000个线程都去操作这个 count 变量,结果符合我们的预期了。那lock到底是怎么实现的呢?
需求分析
我们先来分析分析
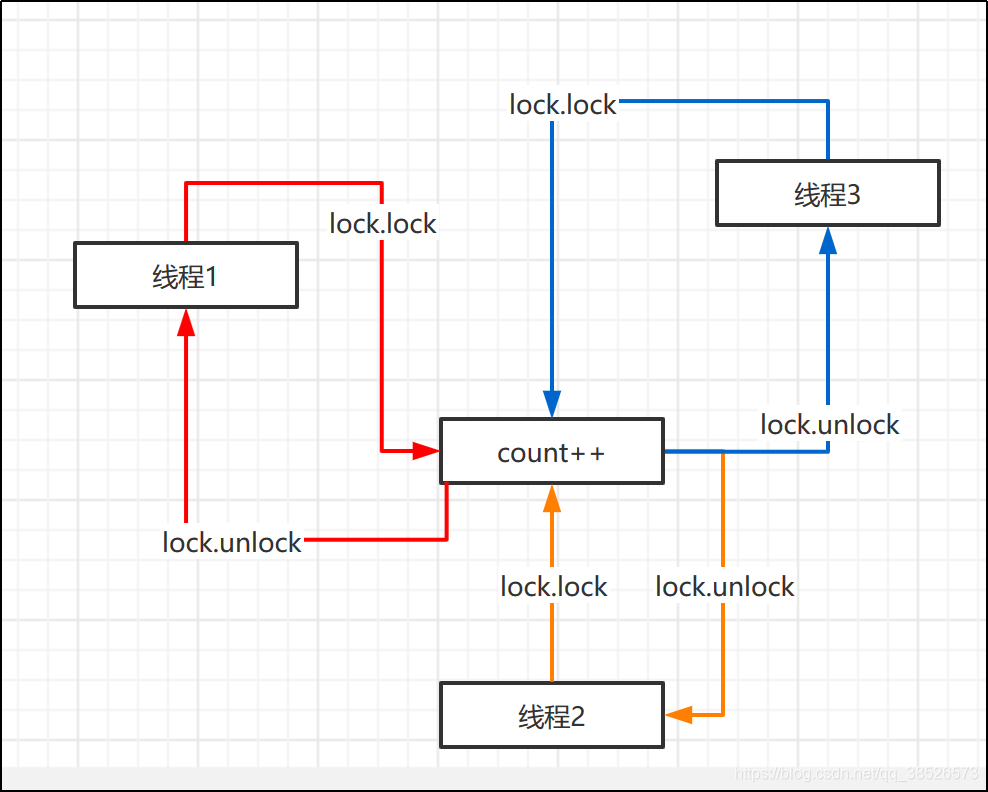
这样的图片看着比较复杂,咱们简化下。
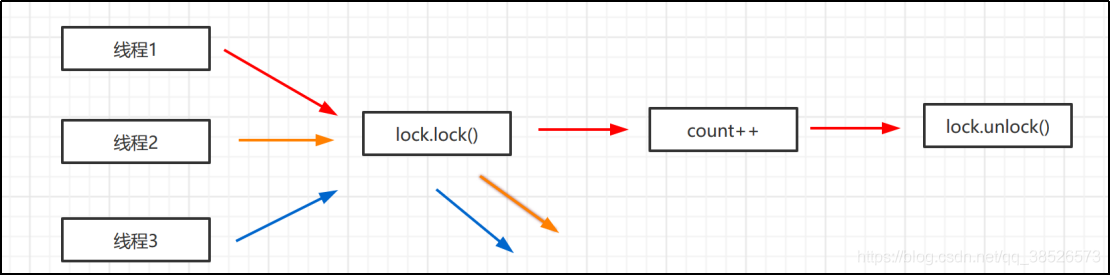
我们自己假设下,如果要你去设计这样的方法,你应该要怎么设计,他们需要实现哪些功能,
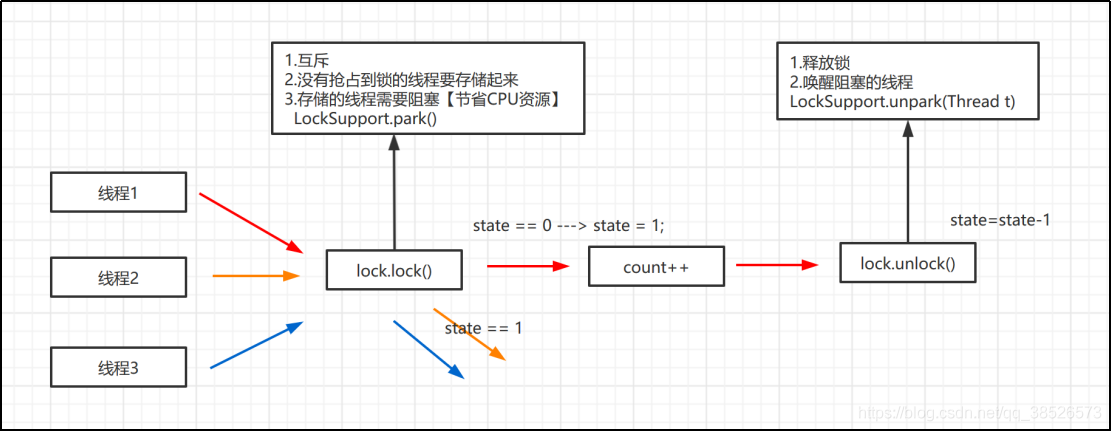
首先是lock方法,它是不是要满足这几个功能。
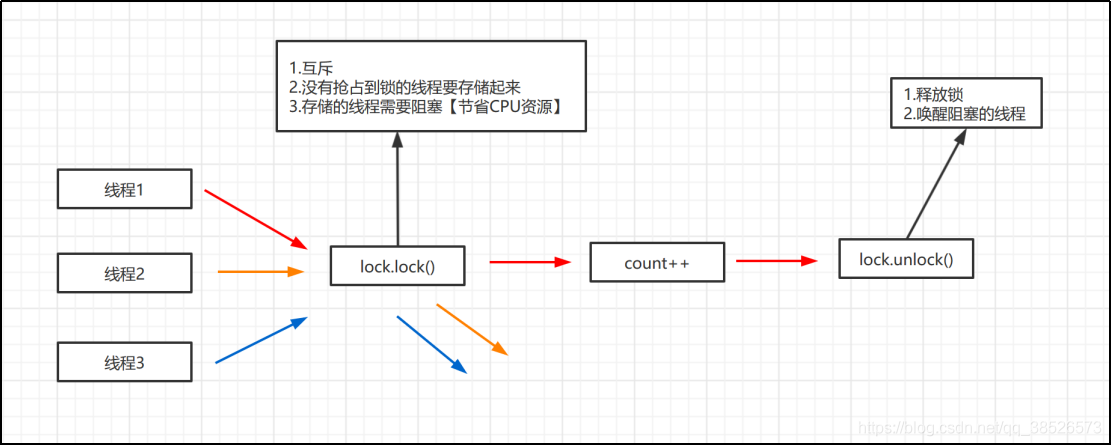
需求清楚了,那我们怎么设计呢?
第一个互斥怎么做,也就是多个线程只有一个线程能抢占到资源,这个时候我们可以这样设置
// 给一个共享资源
Int state = 0 ; // 0表示资源没有被占用,可以抢占
if(state == 0 ){
   // 表示可以获取锁
}else{
   // 表示锁被抢占 需要阻塞等待
}
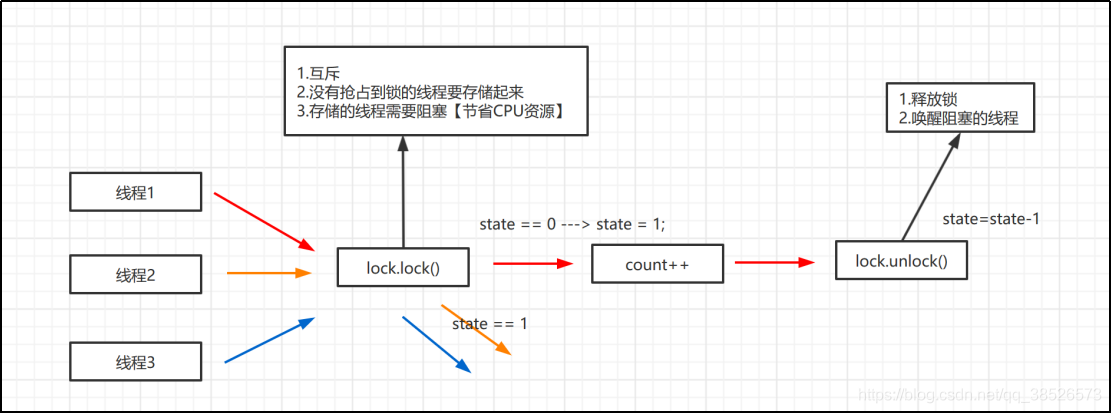
然后就是没有抢占到锁的线程的存储,我们可以通过一个队列,利用FIFO来实现存储。
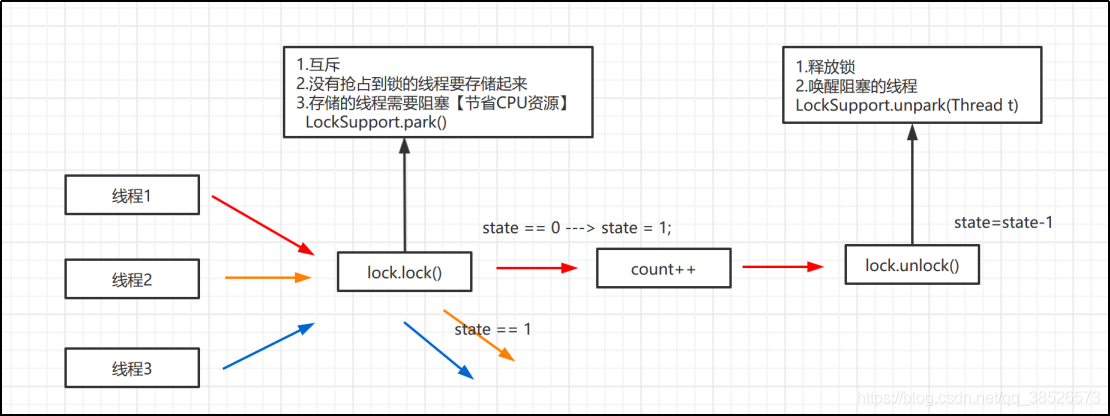
最后就是线程的阻塞和唤醒。大家说说有哪些阻塞线程的方式呀?
- wait/notify: 不合适,不能唤醒指定的线程
- Sleep:休眠,类似于定时器
- Condition:可以唤醒特定线程
- LockSupport:
- LockSupport.park():阻塞当前线程
- LockSupport.unpark(Thread t):唤醒特定线程
结合今天的主题,我们选择LockSupport来实现阻塞和唤醒。
AQS 源码分析
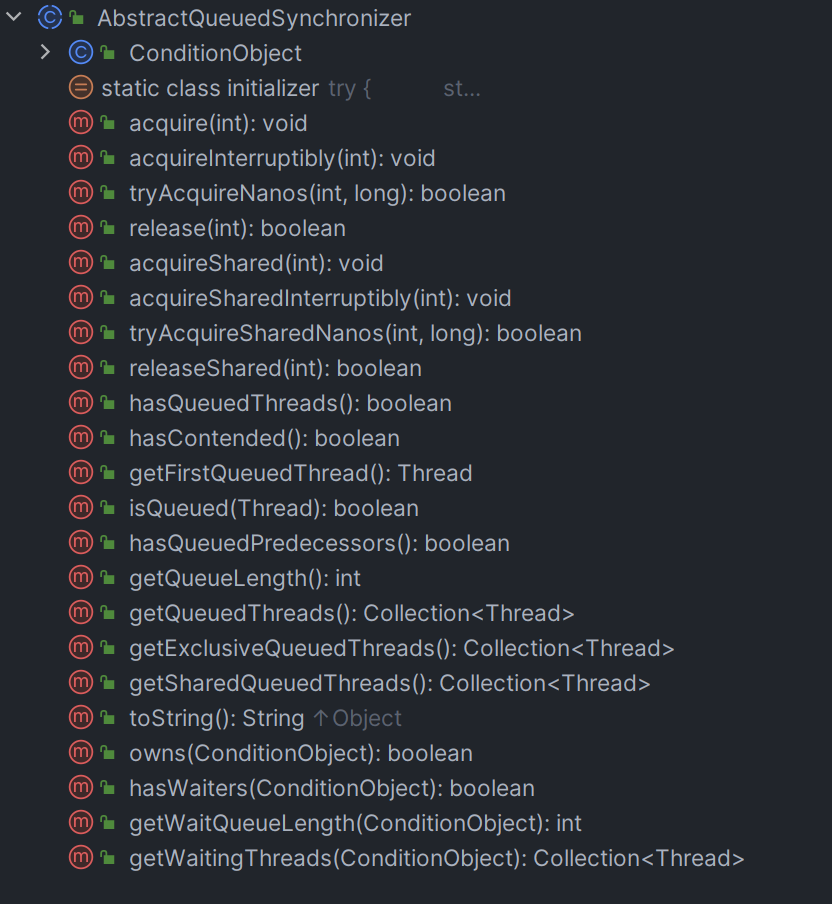
AQS 类图

数据结构
AQS的int类型变量state
    /**
     * The synchronization state.
     */
    private volatile int state;
与之相关的操作
    /**
     * Returns the current value of synchronization state.
     * This operation has memory semantics of a {@code volatile} read.
     * @return current state value
     */
    protected final int getState() {
        return state;
    }

    /**
     * Sets the value of synchronization state.
     * This operation has memory semantics of a {@code volatile} write.
     * @param newState the new state value
     */
    protected final void setState(int newState) {
        state = newState;
    }

    /**
     * Atomically sets synchronization state to the given updated
     * value if the current state value equals the expected value.
     * This operation has memory semantics of a {@code volatile} read
     * and write.
     *
     * @param expect the expected value
     * @param update the new value
     * @return {@code true} if successful. False return indicates that the actual
     *         value was not equal to the expected value.
     */
    protected final boolean compareAndSetState(int expect, int update) {
        // See below for intrinsics setup to support this
        return unsafe.compareAndSwapInt(this, stateOffset, expect, update);
    }
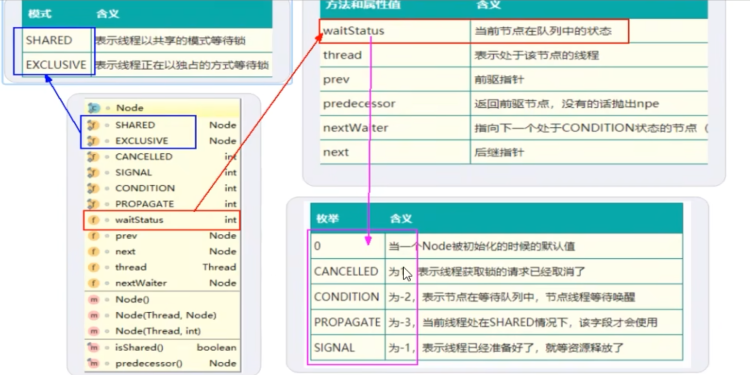
Node 节点
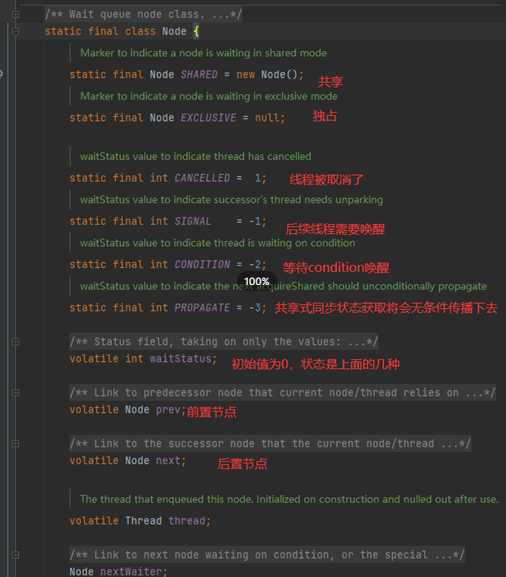
属性说明
源码
    /**
     * Wait queue node class.
     *
     * <p>The wait queue is a variant of a "CLH" (Craig, Landin, and
     * Hagersten) lock queue. CLH locks are normally used for
     * spinlocks.  We instead use them for blocking synchronizers, but
     * use the same basic tactic of holding some of the control
     * information about a thread in the predecessor of its node.  A
     * "status" field in each node keeps track of whether a thread
     * should block.  A node is signalled when its predecessor
     * releases.  Each node of the queue otherwise serves as a
     * specific-notification-style monitor holding a single waiting
     * thread. The status field does NOT control whether threads are
     * granted locks etc though.  A thread may try to acquire if it is
     * first in the queue. But being first does not guarantee success;
     * it only gives the right to contend.  So the currently released
     * contender thread may need to rewait.
     *
     * <p>To enqueue into a CLH lock, you atomically splice it in as new
     * tail. To dequeue, you just set the head field.
     * <pre>
     *      +------+  prev +-----+       +-----+
     * head |      | <---- |     | <---- |     |  tail
     *      +------+       +-----+       +-----+
     * </pre>
     *
     * <p>Insertion into a CLH queue requires only a single atomic
     * operation on "tail", so there is a simple atomic point of
     * demarcation from unqueued to queued. Similarly, dequeuing
     * involves only updating the "head". However, it takes a bit
     * more work for nodes to determine who their successors are,
     * in part to deal with possible cancellation due to timeouts
     * and interrupts.
     *
     * <p>The "prev" links (not used in original CLH locks), are mainly
     * needed to handle cancellation. If a node is cancelled, its
     * successor is (normally) relinked to a non-cancelled
     * predecessor. For explanation of similar mechanics in the case
     * of spin locks, see the papers by Scott and Scherer at
     * http://www.cs.rochester.edu/u/scott/synchronization/
     *
     * <p>We also use "next" links to implement blocking mechanics.
     * The thread id for each node is kept in its own node, so a
     * predecessor signals the next node to wake up by traversing
     * next link to determine which thread it is.  Determination of
     * successor must avoid races with newly queued nodes to set
     * the "next" fields of their predecessors.  This is solved
     * when necessary by checking backwards from the atomically
     * updated "tail" when a node's successor appears to be null.
     * (Or, said differently, the next-links are an optimization
     * so that we don't usually need a backward scan.)
     *
     * <p>Cancellation introduces some conservatism to the basic
     * algorithms.  Since we must poll for cancellation of other
     * nodes, we can miss noticing whether a cancelled node is
     * ahead or behind us. This is dealt with by always unparking
     * successors upon cancellation, allowing them to stabilize on
     * a new predecessor, unless we can identify an uncancelled
     * predecessor who will carry this responsibility.
     *
     * <p>CLH queues need a dummy header node to get started. But
     * we don't create them on construction, because it would be wasted
     * effort if there is never contention. Instead, the node
     * is constructed and head and tail pointers are set upon first
     * contention.
     *
     * <p>Threads waiting on Conditions use the same nodes, but
     * use an additional link. Conditions only need to link nodes
     * in simple (non-concurrent) linked queues because they are
     * only accessed when exclusively held.  Upon await, a node is
     * inserted into a condition queue.  Upon signal, the node is
     * transferred to the main queue.  A special value of status
     * field is used to mark which queue a node is on.
     *
     * <p>Thanks go to Dave Dice, Mark Moir, Victor Luchangco, Bill
     * Scherer and Michael Scott, along with members of JSR-166
     * expert group, for helpful ideas, discussions, and critiques
     * on the design of this class.
     */
    static final class Node {
        /** Marker to indicate a node is waiting in shared mode */
        static final Node SHARED = new Node();
        /** Marker to indicate a node is waiting in exclusive mode */
        static final Node EXCLUSIVE = null;

        /** waitStatus value to indicate thread has cancelled */
        static final int CANCELLED =  1;
        /** waitStatus value to indicate successor's thread needs unparking */
        static final int SIGNAL    = -1;
        /** waitStatus value to indicate thread is waiting on condition */
        static final int CONDITION = -2;
        /**
         * waitStatus value to indicate the next acquireShared should
         * unconditionally propagate
         */
        static final int PROPAGATE = -3;

        /**
         * Status field, taking on only the values:
         *   SIGNAL:     The successor of this node is (or will soon be)
         *               blocked (via park), so the current node must
         *               unpark its successor when it releases or
         *               cancels. To avoid races, acquire methods must
         *               first indicate they need a signal,
         *               then retry the atomic acquire, and then,
         *               on failure, block.
         *   CANCELLED:  This node is cancelled due to timeout or interrupt.
         *               Nodes never leave this state. In particular,
         *               a thread with cancelled node never again blocks.
         *   CONDITION:  This node is currently on a condition queue.
         *               It will not be used as a sync queue node
         *               until transferred, at which time the status
         *               will be set to 0. (Use of this value here has
         *               nothing to do with the other uses of the
         *               field, but simplifies mechanics.)
         *   PROPAGATE:  A releaseShared should be propagated to other
         *               nodes. This is set (for head node only) in
         *               doReleaseShared to ensure propagation
         *               continues, even if other operations have
         *               since intervened.
         *   0:          None of the above
         *
         * The values are arranged numerically to simplify use.
         * Non-negative values mean that a node doesn't need to
         * signal. So, most code doesn't need to check for particular
         * values, just for sign.
         *
         * The field is initialized to 0 for normal sync nodes, and
         * CONDITION for condition nodes.  It is modified using CAS
         * (or when possible, unconditional volatile writes).
         */
        volatile int waitStatus;

        /**
         * Link to predecessor node that current node/thread relies on
         * for checking waitStatus. Assigned during enqueuing, and nulled
         * out (for sake of GC) only upon dequeuing.  Also, upon
         * cancellation of a predecessor, we short-circuit while
         * finding a non-cancelled one, which will always exist
         * because the head node is never cancelled: A node becomes
         * head only as a result of successful acquire. A
         * cancelled thread never succeeds in acquiring, and a thread only
         * cancels itself, not any other node.
         */
        volatile Node prev;

        /**
         * Link to the successor node that the current node/thread
         * unparks upon release. Assigned during enqueuing, adjusted
         * when bypassing cancelled predecessors, and nulled out (for
         * sake of GC) when dequeued.  The enq operation does not
         * assign next field of a predecessor until after attachment,
         * so seeing a null next field does not necessarily mean that
         * node is at end of queue. However, if a next field appears
         * to be null, we can scan prev's from the tail to
         * double-check.  The next field of cancelled nodes is set to
         * point to the node itself instead of null, to make life
         * easier for isOnSyncQueue.
         */
        volatile Node next;

        /**
         * The thread that enqueued this node.  Initialized on
         * construction and nulled out after use.
         */
        volatile Thread thread;

        /**
         * Link to next node waiting on condition, or the special
         * value SHARED.  Because condition queues are accessed only
         * when holding in exclusive mode, we just need a simple
         * linked queue to hold nodes while they are waiting on
         * conditions. They are then transferred to the queue to
         * re-acquire. And because conditions can only be exclusive,
         * we save a field by using special value to indicate shared
         * mode.
         */
        Node nextWaiter;
        ...
    }
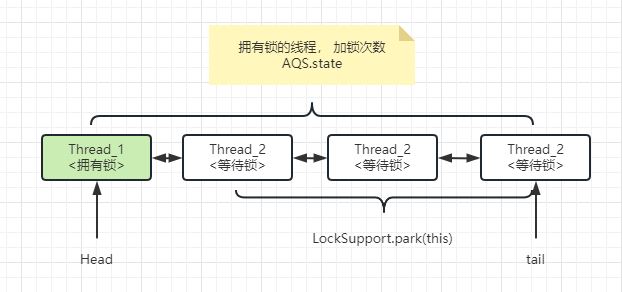
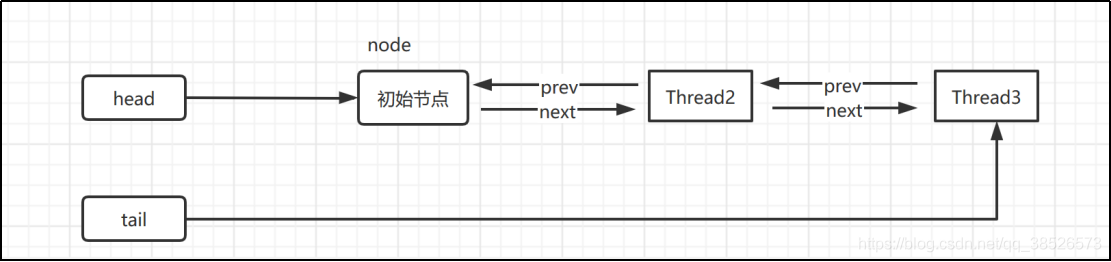
AQS的CLH队列
CLH(三个大牛的名字组成)队列为一个双向队列

- 有阻塞就需要排队,实现排队必然需要队列
- State变量+CLH双端队列
定义的方法
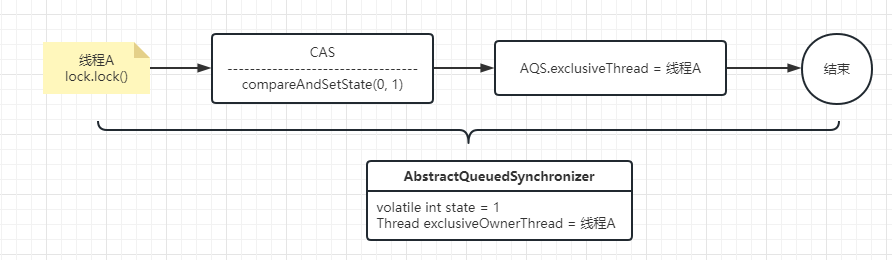
Lock.lock()
抢占锁
- 成功 -> 设置成独占锁
- 失败 -> [[#acquire方法]]
final void lock() {
    if (compareAndSetState(0, 1))
        setExclusiveOwnerThread(Thread.currentThread());
    else
        acquire(1);
}
这个方法逻辑比较简单,if条件成立说明 抢占锁成功并设置 当前线程为独占锁
else 表示抢占失败,acquire(1) 方法我们后面具体介绍
compareAndSetState(0, 1):用到了CAS 是一个原子操作方法,底层是UnSafe.作用就是设置 共享操作的 state 由0到1. 如果state的值是0就修改为1
setExclusiveOwnerThread:代码很简单,进去看一眼即可
acquire方法
获取锁
- 尝试抢锁 -> [[#tryAcquire(int)]]
- 抢锁失败 -> 尝试入队 [[#addWaiter]]
- 都失败 -> 自我中断selfInterrupt()
public final void acquire(int arg) {
    if (!tryAcquire(arg) &&
        acquireQueued(addWaiter(Node.EXCLUSIVE), arg))
        selfInterrupt();
}
- tryAcquire()尝试直接去获取资源,如果成功则直接返回(这里体现了非公平锁,每个线程获取锁时会尝试直接抢占加塞一次,而CLH队列中可能还有别的线程在等待);
- addWaiter()将该线程加入等待队列的尾部,并标记为独占模式;
- acquireQueued()使线程阻塞在等待队列中获取资源,一直获取到资源后才返回。如果在整个等待过程中被中断过,则返回true,否则返回false。如果线程在等待过程中被中断过,它是不响应的。只是获取资源后才再进行自我中断selfInterrupt(),将中断补上。
tryAcquire(int)
再次尝试抢占锁
-> [[#nonfairTryAcquire]]
protected final boolean tryAcquire(int acquires) {
    return nonfairTryAcquire(acquires);
}
nonfairTryAcquire
非公平抢锁
- 锁状态 == 0 尝试抢锁
- 锁状态 != 0 && current == getExclusiveOwnerThread
- 自己是拥有锁的线程
- 重入锁
- 失败
final boolean nonfairTryAcquire(int acquires) {
    final Thread current = Thread.currentThread();
    int c = getState();
//再次尝试抢占锁
    if (c == 0) {
        if (compareAndSetState(0, acquires)) {
            setExclusiveOwnerThread(current);
            return true;
        }
    }
// 重入锁的情况
    else if (current == getExclusiveOwnerThread()) {
        int nextc = c + acquires;
        if (nextc < 0) // overflow
            throw new Error("Maximum lock count exceeded");
        setState(nextc);
        return true;
    }
// false 表示抢占失败
    return false;
}
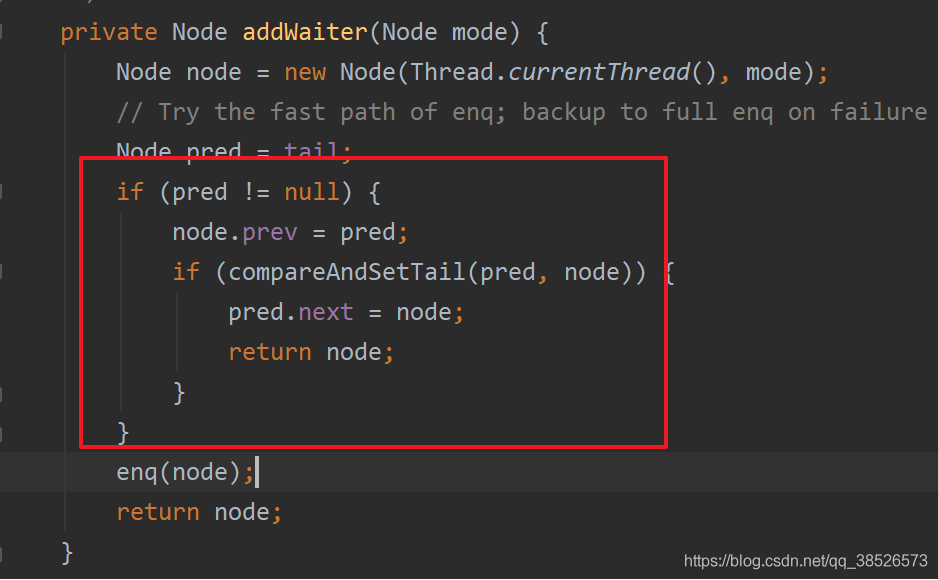
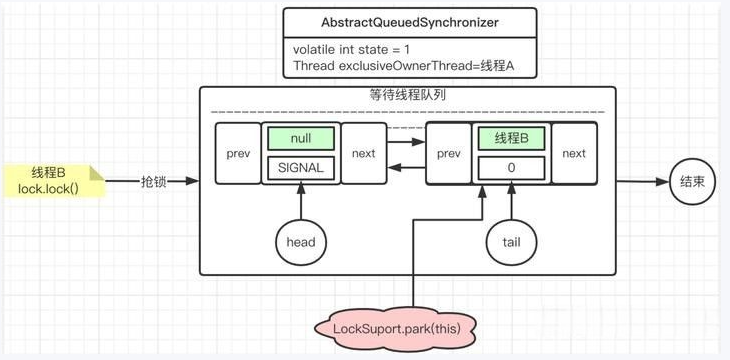
addWaiter
将阻塞的线程添加到双向链表的结尾
- 尾节点不为空 -> CAS 进行节点插入
- 失败 -> [[#enq(Node)]]
private Node addWaiter(Node mode) {
    //以给定模式构造结点。mode有两种:EXCLUSIVE(独占)和SHARED(共享)
    Node node = new Node(Thread.currentThread(), mode);

    //尝试快速方式直接放到队尾。
    Node pred = tail;
    if (pred != null) {
        node.prev = pred;
        if (compareAndSetTail(pred, node)) {
            pred.next = node;
            return node;
        }
    }

    //上一步失败则通过enq入队。
    enq(node);
    return node;
}
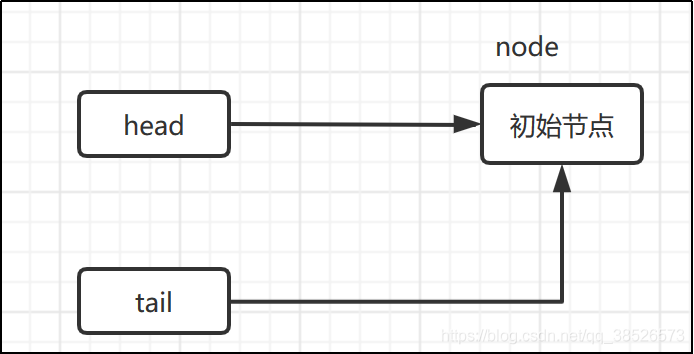
enq(Node)
- 自旋
- 尾节点为空 -> 创建空的标记节点作为 head 节点
- 正常流程 -> CAS 自旋
private Node enq(final Node node) {
    //CAS"自旋",直到成功加入队尾
    for (;;) {
        Node t = tail;
        if (t == null) { // 队列为空,创建一个空的标志结点作为head结点,并将tail也指向它。
            if (compareAndSetHead(new Node()))
                tail = head;
        } else {//正常流程,放入队尾
            node.prev = t;
            if (compareAndSetTail(t, node)) {
                t.next = node;
                return t;
            }
        }
    }
}
第一个if语句
else语句
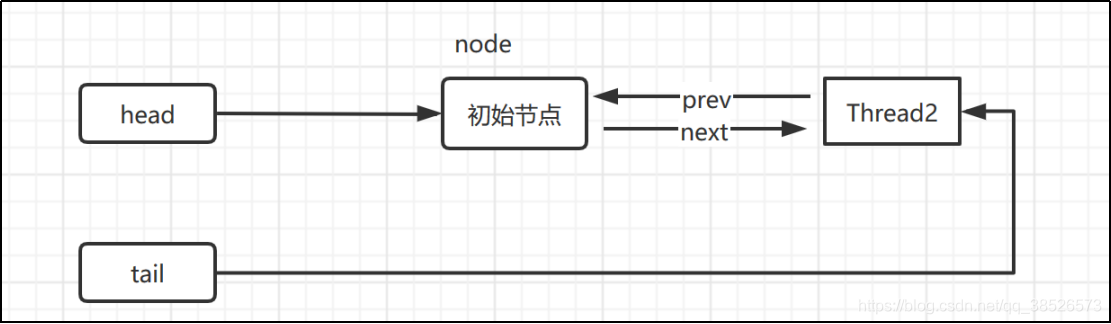
线程3进来会执行如下代码
那么效果图
acquireQueued(Node, int)
线程 进入等待状态休息,直到其他线程彻底释放资源后唤醒自己,自己再拿到资源
OK,通过tryAcquire()和addWaiter(),该线程获取资源失败,已经被放入等待队列尾部了。聪明的你立刻应该能想到该线程下一部该干什么了吧:进入等待状态休息,直到其他线程彻底释放资源后唤醒自己,自己再拿到资源,然后就可以去干自己想干的事了。没错,就是这样!是不是跟医院排队拿号有点相似 ~ acquireQueued()就是干这件事:在等待队列中排队拿号(中间没其它事干可以休息),直到拿到号后再返回。
- 结点进入队尾后,检查状态,找到安全休息点;
- 调用park()进入waiting状态,等待unpark()或interrupt()唤醒自己;
- 被唤醒后,看自己是不是有资格能拿到号。如果拿到,head指向当前结点,并返回从入队到拿到号的整个过程中是否被中断过;如果没拿到,继续流程1。
final boolean acquireQueued(final Node node, int arg) {
    boolean failed = true;//标记是否成功拿到资源
    try {
        boolean interrupted = false;//标记等待过程中是否被中断过

        //又是一个“自旋”!
        for (;;) {
            final Node p = node.predecessor();//拿到前驱
            //如果前驱是head,即该结点已成老二,那么便有资格去尝试获取资源(可能是老大释放完资源唤醒自己的,当然也可能被interrupt了)。
            if (p == head && tryAcquire(arg)) {
                setHead(node);//拿到资源后,将head指向该结点。所以head所指的标杆结点,就是当前获取到资源的那个结点或null。
                p.next = null; // setHead中node.prev已置为null,此处再将head.next置为null,就是为了方便GC回收以前的head结点。也就意味着之前拿完资源的结点出队了!
                failed = false; // 成功获取资源
                return interrupted;//返回等待过程中是否被中断过
            }

            //如果自己可以休息了,就通过park()进入waiting状态,直到被unpark()。如果不可中断的情况下被中断了,那么会从park()中醒过来,发现拿不到资源,从而继续进入park()等待。
            if (shouldParkAfterFailedAcquire(p, node) &&
                parkAndCheckInterrupt())
                interrupted = true;//如果等待过程中被中断过,哪怕只有那么一次,就将interrupted标记为true
        }
    } finally {
        if (failed) // 如果等待过程中没有成功获取资源(如timeout,或者可中断的情况下被中断了),那么取消结点在队列中的等待。
            cancelAcquire(node);
    }
}
到这里了,我们先不急着总结acquireQueued()的函数流程,先看看shouldParkAfterFailedAcquire()和parkAndCheckInterrupt()具体干些什么。
shouldParkAfterFailedAcquire(Node pred, Node node)
- pred.waitStatus
- ws == Node.SIGNAL 如果已经告诉前驱拿完号后通知自己一下,那就可以安心休息了
- ws > 0 如果前驱放弃了,那就一直往前找,直到找到最近一个正常等待的状态,并排在它的后边。
- ws < 0 如果前驱正常,那就把前驱的状态设置成SIGNAL,告诉它拿完号后通知自己一下。有可能失败,人家说不定刚刚释放完呢!
private static boolean shouldParkAfterFailedAcquire(Node pred, Node node) {
    int ws = pred.waitStatus;//拿到前驱的状态
    if (ws == Node.SIGNAL)
        //如果已经告诉前驱拿完号后通知自己一下,那就可以安心休息了
        return true;
    if (ws > 0) {
        /*
         * 如果前驱放弃了,那就一直往前找,直到找到最近一个正常等待的状态,并排在它的后边。
         * 注意:那些放弃的结点,由于被自己“加塞”到它们前边,它们相当于形成一个无引用链,稍后就会被保安大叔赶走了(GC回收)!
         */
        do {
            node.prev = pred = pred.prev;
        } while (pred.waitStatus > 0);
        pred.next = node;
    } else {
         //如果前驱正常,那就把前驱的状态设置成SIGNAL,告诉它拿完号后通知自己一下。有可能失败,人家说不定刚刚释放完呢!
        compareAndSetWaitStatus(pred, ws, Node.SIGNAL);
    }
    return false;
}
整个流程中,如果前驱结点的状态不是SIGNAL,那么自己就不能安心去休息,需要去找个安心的休息点,同时可以再尝试下看有没有机会轮到自己拿号。
parkAndCheckInterrupt()
如果线程找好安全休息点后,那就可以安心去休息了。此方法就是让线程去休息,真正进入等待状态。
 private final boolean parkAndCheckInterrupt() {
     LockSupport.park(this);//调用park()使线程进入waiting状态
     return Thread.interrupted();//如果被唤醒,查看自己是不是被中断的。
 }
好了,我们可以小结下了。
看了shouldParkAfterFailedAcquire()和parkAndCheckInterrupt(),现在让我们再回到acquireQueued(),总结下该函数的具体流程:
acquire() 总结
总结下它的流程吧
- 调用自定义同步器的tryAcquire()尝试直接去获取资源,如果成功则直接返回;
- 没成功,则addWaiter()将该线程加入等待队列的尾部,并标记为独占模式;
- acquireQueued()使线程在等待队列中休息,有机会时(轮到自己,会被unpark())会去尝试获取资源。获取到资源后才返回。如果在整个等待过程中被中断过,则返回true,否则返回false。
- 如果线程在等待过程中被中断过,它是不响应的。只是获取资源后才再进行自我中断selfInterrupt(),将中断补上。
Lock.unlock()
release(int)
它会释放指定量的资源,如果彻底释放了(即state=0),它会唤醒等待队列里的其他线程来获取资源。这也正是unlock()的语义,当然不仅仅只限于unlock()
public final boolean release(int arg) {
        if (tryRelease(arg)) {//这里是先尝试释放一下资源,一般都可以释放成功,除了多次重入但只释放一次的情况。
            Node h = head;
            //这里判断的是 阻塞队列是否还存在和head节点是否是tail节点,因为之前说过,队列的尾节点的waitStatus是为0的
            if (h != null && h.waitStatus != 0)
                //到这里就说明head节点已经释放成功啦,就先去叫醒后面的直接节点去抢资源吧
                unparkSuccessor(h);
            return true;
        }
        return false;
    }
tryRelease(int)
此方法尝试去释放指定量的资源。下面是tryRelease()的源码:
可以看到state - 1, 也就是我们前面说的每次上锁都会在state+1 ,并且判断当前线程是否是拥有锁的线程, 所以lock2次之后, unlock三次就会报错
当state=0 的时候将锁的线程置为null
    protected final boolean tryRelease(int releases) {
        int c = getState() - releases;
        if (Thread.currentThread() != getExclusiveOwnerThread())
            throw new IllegalMonitorStateException();
        boolean free = false;
        if (c == 0) {
            free = true;
            setExclusiveOwnerThread(null);
        }
        setState(c);
        return free;
    }
解锁后继节点
该⽅法的⽤途是:如果节点的接班⼈(successor)存在的话,则唤醒它
private void unparkSuccessor(Node node) {
    //这里,node一般为当前线程所在的结点。
    int ws = node.waitStatus;
    if (ws < 0)//置零当前线程所在的结点状态,允许失败。
        compareAndSetWaitStatus(node, ws, 0);

    Node s = node.next;//找到下一个需要唤醒的结点s
    if (s == null || s.waitStatus > 0) {//如果为空或已取消
        s = null;
        for (Node t = tail; t != null && t != node; t = t.prev) // 从后向前找。
            if (t.waitStatus <= 0)//从这里可以看出,<=0的结点,都是还有效的结点。
                s = t;
    }
    if (s != null)
        LockSupport.unpark(s.thread);//唤醒
}
这个函数并不复杂。
Release 总结
用unpark()唤醒等待队列中最前边的那个未放弃线程,这里我们也用s来表示吧。
此时,再和acquireQueued()联系起来,s被唤醒后,进入if (p == head && tryAcquire(arg))的判断(即使p!=head也没关系,它会再进入shouldParkAfterFailedAcquire()寻找一个安全点。
这里既然s已经是等待队列中最前边的那个未放弃线程了,那么通过shouldParkAfterFailedAcquire()的调整,s也必然会跑到head的next结点,下一次自旋p==head就成立啦),然后s把自己设置成head标杆结点,表示自己已经获取到资源了,acquire()也返回了
加锁和解锁的队列演示
AQS在加锁和解锁过程中,对队列节点的操作进⾏演示,在详细介绍演示之前,我 们先来整体看⼀下,如果有线程A、线程B和线程C这三个线程在AQS的调度下,会是什么样⼦的
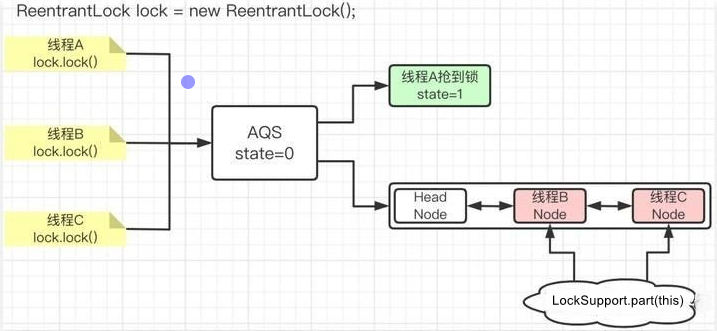
其中,线程A⾸先抢到锁,所以它不需要链表进⾏排队。
那么线程B和线程C由于没有抢到锁(由 state是否等于0进⾏判断),那么就需要组成⼀个链表,头节点就是⼀个“空”的节点(即:通过 new Node())创建的。
⽽线程B和线程C则会相机组成链表,并调⽤park阻塞操作。等待后续的 unpark解除阻塞
加锁操作队列演示
线程A第一个执行了lock()
线程B第二个执行了lock(),此时会构建等待队列链表
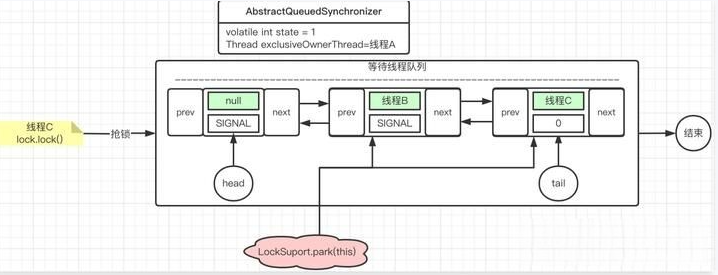
线程C再执行lock()
解锁操作队列
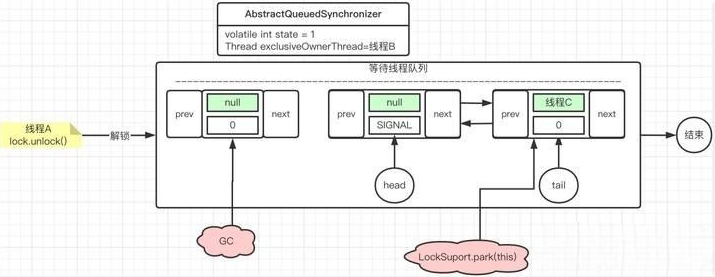
解锁操作伴随着加锁操作,那么下⾯我们先假设⼀个场景,即使线程A先抢到了锁,线程B阻塞等 待,那么当线程A执⾏完毕掉⽤了unlock⽅法后,如何唤醒线程B去继续抢锁的
现在,我们把视野再拉回来。我们在上⾯演示了多个线程的加锁操作对线程等待队列的影响。那 么,我们再来看⼀下这些线程分别调⽤解锁操作,这个队列中的等待线程⼜会是怎么的操作逻辑 呢?好,下⾯我们就先来看⼀下线程A执⾏unlock操作
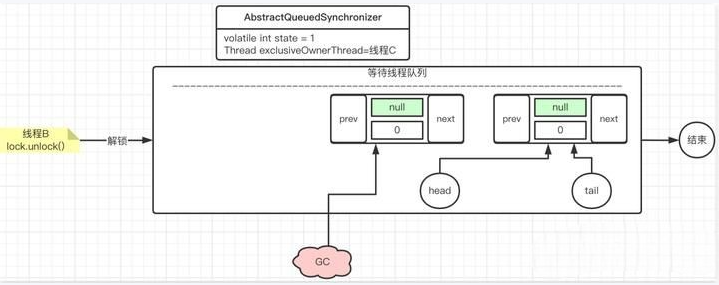
线程B执行unlock
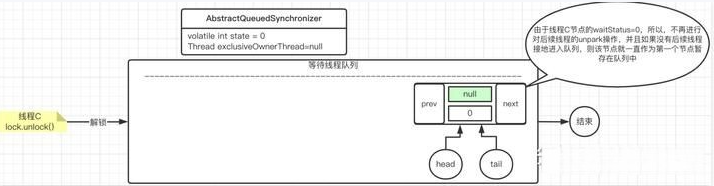
线程C执行
总结
 wechat
 alipay