【Spring Security】 Oauth2 开放平台授权服务四种授权模式
【Spring Security】 Oauth2 开放平台授权服务四种授权模式
Metadata
title: 【Spring Security】 Oauth2 开放平台授权服务四种授权模式
date: 2023-02-02 22:09
tags:
  - 行动阶段/完成
  - 主题场景/组件
  - 笔记空间/KnowladgeSpace/ProgramSpace/ModuleSpace
  - 细化主题/Module/SpringSecurity
categories:
  - SpringSecurity
keywords:
  - SpringSecurity
description: 【Spring Security】 Oauth2 开放平台授权服务四种授权模式
配置
1. 添加 WebSecurityConfigurerAdapter 配置
加入了一个密码解析器,在内存中添加一个用户,后续会添加其他配置。
@Configuration
@EnableWebSecurity(debug = true)
@EnableGlobalMethodSecurity(prePostEnabled = true, securedEnabled = true, jsr250Enabled = true)
public class MyWebSecurityConfiguration extends WebSecurityConfigurerAdapter {
    @Override
    public void configure(WebSecurity web) throws Exception {
        super.configure(web);
    }

    @Override
    protected void configure(HttpSecurity http) throws Exception {
        super.configure(http);
    }

    @Override
    protected void configure(AuthenticationManagerBuilder auth) throws Exception {
        auth.inMemoryAuthentication()
                // 在内存中创建用户并为密码加密
                .withUser("user").password(passwordEncoder().encode("123456")).roles("USER");
    }

    // 密码解析器
    @Bean
    public BCryptPasswordEncoder passwordEncoder() {
        return new BCryptPasswordEncoder();
    }

}
2. 添加 AuthorizationServerConfigurerAdapter 配置
AuthorizationServerConfigurerAdapter 是授权服务器的配置类,这里配置了一个 Oauth2 客户端在内存中,后续会集成数据库存储。
@Configuration
@EnableAuthorizationServer
public class MyAuthorizationServerConfiguration extends AuthorizationServerConfigurerAdapter {


    @Autowired
    private PasswordEncoder passwordEncoder;

    @Override
    public void configure(ClientDetailsServiceConfigurer clients) throws Exception {
        // 配置客户端
        clients
                // 使用内存设置
                .inMemory()
                // client_id
                .withClient("client")
                // client_secret
                .secret(passwordEncoder.encode("secret"))
                // 授权类型: 授权码、刷新令牌
                .authorizedGrantTypes("authorization_code","refresh_token")
                // 授权范围
                .scopes("app")
                // 注册回调地址
                .redirectUris("http://localhost:20000/code");
    }
}
默认端点 URL
提供了默认端点 URL(访问接口),我们进行 Oauth2 认证时,需要用到。
- /oauth/authorize:授权端点。
- /oauth/token:令牌端点。
- /oauth/confirm_access:用户确认授权提交端点。
- /oauth/error:授权服务错误信息端点。
- /oauth/check_token:用于资源服务访问的令牌解析端点。
- /oauth/token_key:提供公有密匙的端点,如果你使用 JWT 令牌的话。
四种授权模式
授权码模式
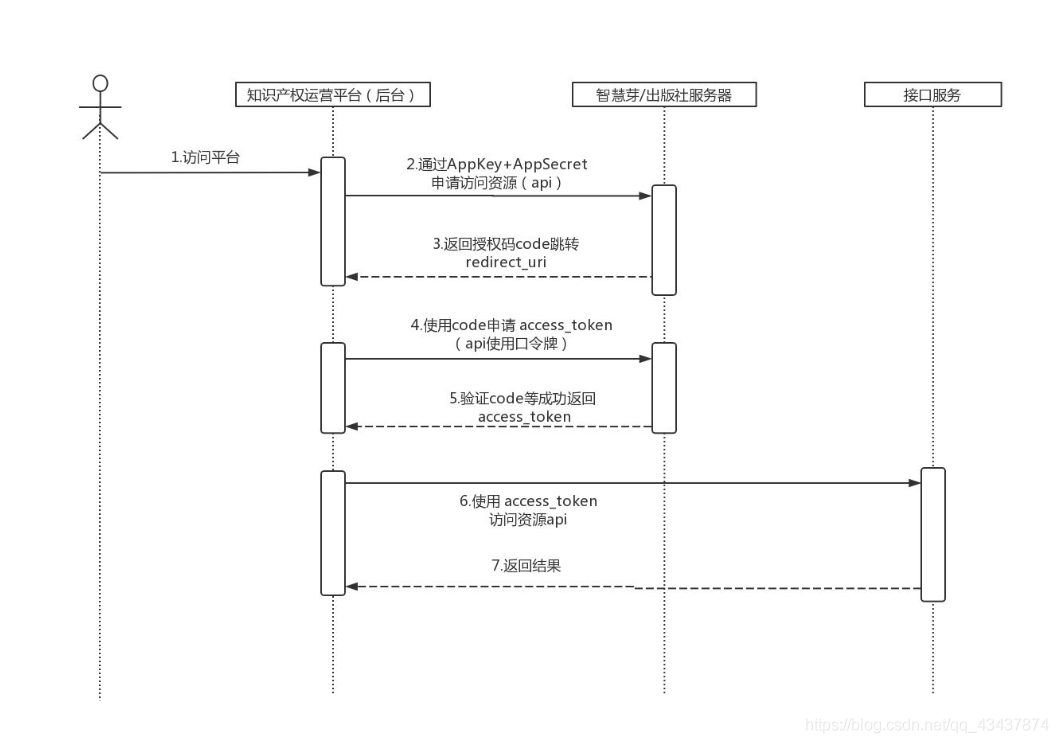
首先回顾下授权码模式流程,由图可以看出,获取令牌,主要需要以下几步:
- Oauth Client 客户端通过客户端的账号密码获取 code
- 使用 code 获取令牌
- 携带令牌访问资源
1. 获取授权码
访问获取授权码的端点
http://localhost:20000/oauth/authorize?client_id=client&client_secret=secret&response_type=code
参数说明:
| 参数 | 说明 | 是否必填 |
|---|---|---|
| client_id | 用来标识客户的 Id | YES |
| client_secret | (需要值得信任的客户端)客户端密码 | YES |
| response_type | 授权码模式固定为 code | YES |
| redirect_uri | 跳转 uri,当授权码申请成功后会跳转到此地址,并在后边带上 code 参数(授权码) | NO |
| scope | 用来限制客户端的访问范围,如果为空(默认)的话,那么客户端拥有全部的访问范围 | NO |
| state | 可以取随机值, 用于防止 CORS 攻击 | NO |
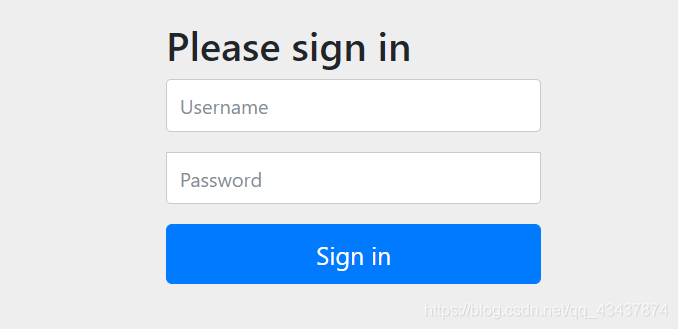
之后会调转到登录接口,输入用户名密码
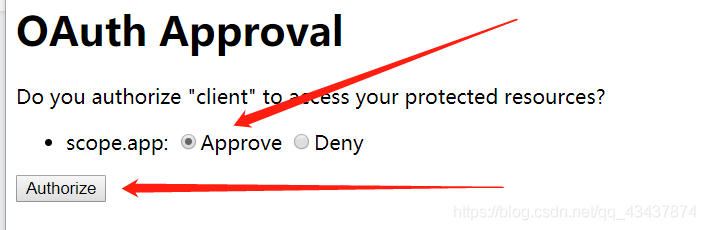
2. 获取授权码
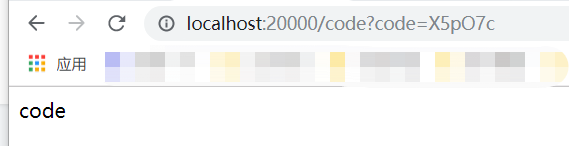
登录成功后跳转到授权页面,是否允许这个客户端访问你的资源,选择 Approve,点击同意 authorize。

之后浏览器会重定向到配置的回调地址,并携带了授权码,所以这个回调地址应该是添加客户端服务器自身的地址。
3. 获取令牌
访问令牌端点获取令牌,需要 Post 请求,这里使用 postman。
Post 请求访问端点:
http://localhost:20000/oauth/token
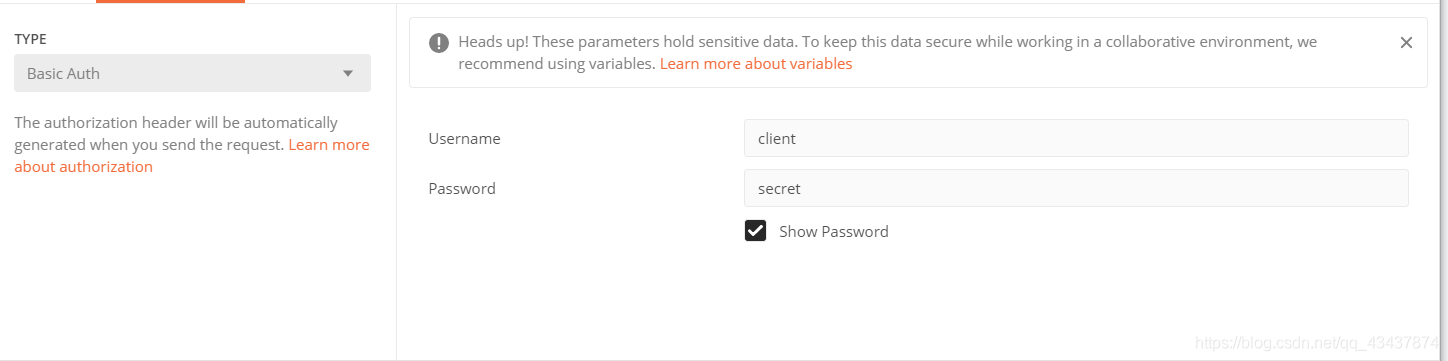
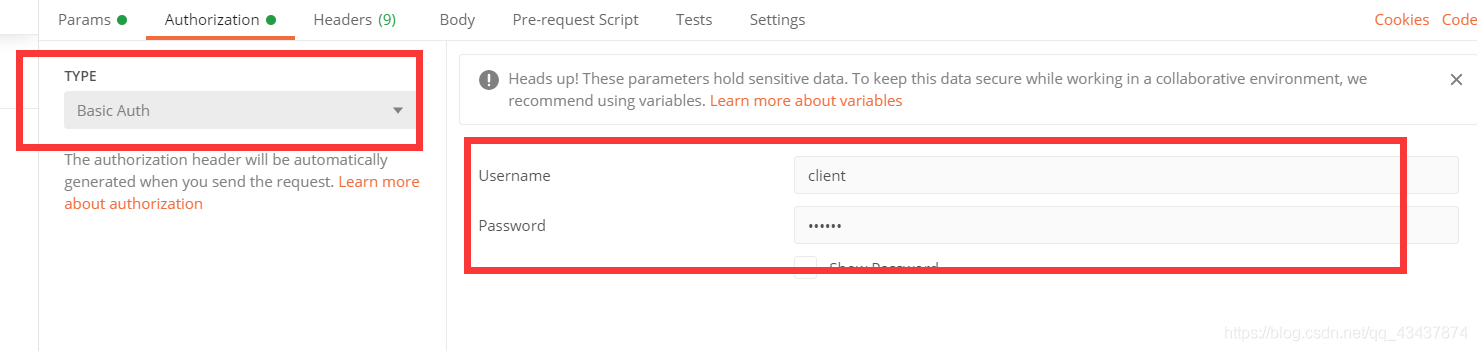
首先需要传入客户端的 ID 及密码,采用 httpBasic 认证方式,并将其拼接成 “用户名: 密码” 格式,中间是一个冒号,再用 base64 编码成 xxx,然后在请求头中附加 Authorization:Basic xxx。这里可以使用 postman 选择 Basic Auth,然后输入客户端 ID 及密码。
添加参数:

参数说明:
| 参数 | 说明 |
|---|---|
| code | 授权码,就是刚刚获取的授权码,注意:授权码只使用一次就无效了,需要重新申请 |
| grant_type | 授权类型,填写 authorization_code,表示授权码模式 |
| redirect_uri | 申请授权码时的跳转 url,一定和申请授权码时用的 redirect_uri 一致。 |
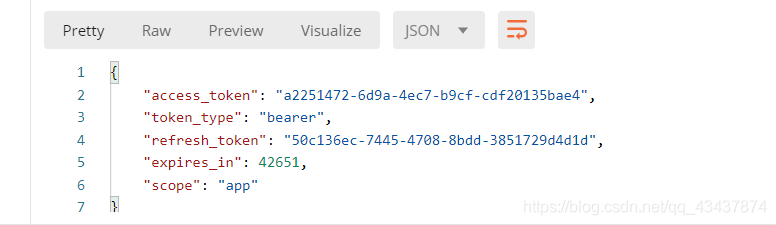
访问,获取到访问及刷新令牌。
{
    "access_token": "0ce36dcf-79c0-490e-873b-d3e295028b73",
    "token_type": "bearer",
    "refresh_token": "7b67b4b3-87a9-4b40-970d-44598f9cb355",
    "expires_in": 42723,
    "scope": "app"
}
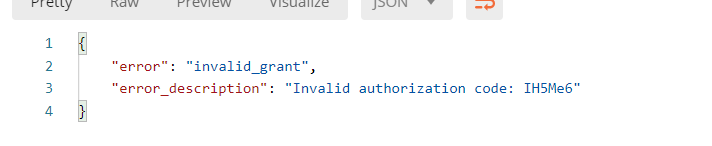
当再次点击时,会报错,说明 code 只能使用一次。
密码模式
密码模式直接使用用户名密码获取令牌,这种方式一般用于自家应用。
1. 添加认证管理器
之前说过,SpringSecurity 使用认证管理器进行登录认证,那么在 Oauth2 中,需要配置一个端点的认证管理器,才能使用用户名密码进行认证。
在 MyWebSecurityConfiguration 中注入一个认证管理器:
    // 配置认证管理器
    @Override
    @Bean
    public AuthenticationManager authenticationManagerBean() throws Exception {
        return super.authenticationManagerBean();
    }
在 MyAuthorizationServerConfiguration 配置认证管理器,添加 Oauth2 客户端密码模式支持。
@Configuration
@EnableAuthorizationServer
public class MyAuthorizationServerConfiguration extends AuthorizationServerConfigurerAdapter {


    @Autowired
    private PasswordEncoder passwordEncoder;
    @Autowired
     private AuthenticationManager authenticationManager;

    @Override
    public void configure(ClientDetailsServiceConfigurer clients) throws Exception {
        // 配置客户端
        clients
                // 使用内存设置
                .inMemory()
                // client_id
                .withClient("client")
                // client_secret
                .secret(passwordEncoder.encode("secret"))
                // 授权类型: 授权码、刷新令牌、密码、客户端、
                .authorizedGrantTypes("authorization_code","refresh_token","password","client_credentials")
                // 授权范围
                .scopes("app")
                // 注册回调地址
                .redirectUris("http://localhost:20000/code");
    }
    // 端点配置
    @Override
    public void configure(AuthorizationServerEndpointsConfigurer endpoints) throws Exception {
        // 配置端点允许的请求方式
        endpoints.allowedTokenEndpointRequestMethods(HttpMethod.GET, HttpMethod.POST);
        // 配置认证管理器
        endpoints.authenticationManager(authenticationManager);
    }
}
2. 获取令牌
Post 请求访问请求端点:
http://localhost:20000/oauth/token
添加参数:

参数说明:
| 参数 | 说明 |
|---|---|
| grant_type | 授权码类型,固定为 password |
| username | 用户的账号 |
| password | 用户的密码 |
和授权码模式一样,添加认证消息头:

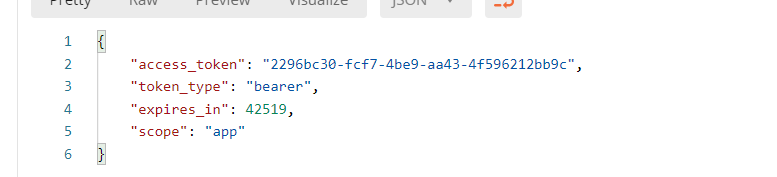
获取令牌,多次点击,发现我们获取到的令牌是一样的,只是 expires_in 在变化。
客户端模式
客户端模式,可以直接通过接口返回令牌。
访问端点,grant_type 为 client_credentials:
http://localhost:20000/oauth/token?grant_type=client_credentials
消息头添加 Httpbasic 认证:
访问返回令牌:
简化模式
简化模式 (Implicit) 也翻译做隐式模式或者紧凑模式,简化是针对授权码模式简化,没有授权码再获取令牌这一步。
简化模式可以通过客户端名称和一个 redirect_uri,访问认证服务器,认证服务器认证之后,直接返回一个令牌,该令牌会在 redirect_uri 的后边使用 #连接。
客户端添加简化模式支持:
// 授权类型: 授权码、刷新令牌、密码、客户端、简化模式
.authorizedGrantTypes("authorization_code","refresh_token","password","client_credentials","implicit")
访问端点,主要是 response_type 为 token
http://localhost:20000/oauth/authorize?client_id=client&client_secret=secret&response_type=token
之后进行登录和授权,和授权码模式一致。
点击授权后,直接通过回调地址返回了 token 及过期时间。

 wechat
 alipay