【Spring Security】 Oauth2 RedisTokenStore
【Spring Security】 Oauth2 RedisTokenStore
Metadata
title: 【Spring Security】 Oauth2 RedisTokenStore
date: 2023-02-05 15:02
tags:
  - 行动阶段/完成
  - 主题场景/组件
  - 笔记空间/KnowladgeSpace/ProgramSpace/ModuleSpace
  - 细化主题/Module/SpringSecurity
categories:
  - SpringSecurity
keywords:
  - SpringSecurity
description: 【Spring Security】 Oauth2 RedisTokenStore
【Spring Security】 Oauth2 RedisTokenStore
在上篇文档我们分析了 Security 登录后将用户信息保存在 [[Session]] 中,用户访问时,会获取 Session 中的数据绑定到 ThreadLocal 中。
在 [[【Spring Security】 Oauth2 颁发令牌端点]]我们分析了在 Spring Security oauth2 中,是使用授权模式去获取令牌,而令牌的对应信息是保存在了 TokenStore 中。
所以接下来了解下如何使用 RedisTokenStore 在 Redis 中存储令牌的认证信息。
TokenStore
TokenStore,意为令牌存储,是一个接口,主要定义了存储及获取令牌信息的一些方法:
public interface TokenStore {
    // 使用OAuth2AccessToken 或者字符串读取认证信息
    OAuth2Authentication readAuthentication(OAuth2AccessToken var1);
    OAuth2Authentication readAuthentication(String var1);

    // 存储访问令牌,传入AccessToken和Authentication对象
    void storeAccessToken(OAuth2AccessToken var1, OAuth2Authentication var2);
    // 读取AccessToken
    OAuth2AccessToken readAccessToken(String var1);
    // 传入AccessToken,移除AccessToken
    void removeAccessToken(OAuth2AccessToken var1);
    // 存储刷新令牌
    void storeRefreshToken(OAuth2RefreshToken var1, OAuth2Authentication var2);
    // 读取刷新令牌
    OAuth2RefreshToken readRefreshToken(String var1);
    // 使用刷新令牌获取认证对象
    OAuth2Authentication readAuthenticationForRefreshToken(OAuth2RefreshToken var1);
    // 移除刷新令牌
    void removeRefreshToken(OAuth2RefreshToken var1);
    // 使用刷新令牌移除访问令牌
    void removeAccessTokenUsingRefreshToken(OAuth2RefreshToken var1);
    // 使用Authentication获取AccessToken
    OAuth2AccessToken getAccessToken(OAuth2Authentication var1);
    // 使用用户名和ClientId获取访问访问令牌集合
    Collection<OAuth2AccessToken> findTokensByClientIdAndUserName(String var1, String var2);
    // 使用ClientId获取访问访问令牌集合
    Collection<OAuth2AccessToken> findTokensByClientId(String var1);
}
在 spring-security-oauth2 模块中的org.springframework.security.oauth2.provider.token.store包下定义了五种存储令牌的方式。
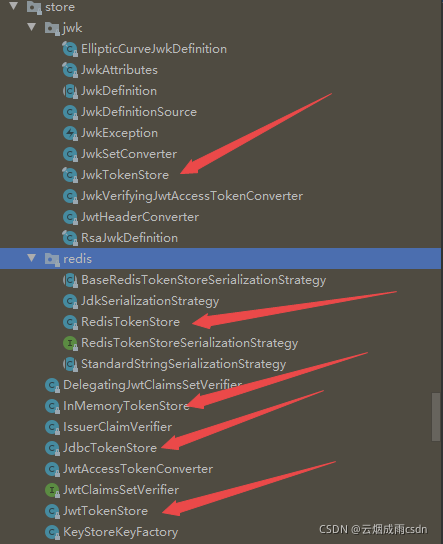
1. JdbcTokenStore
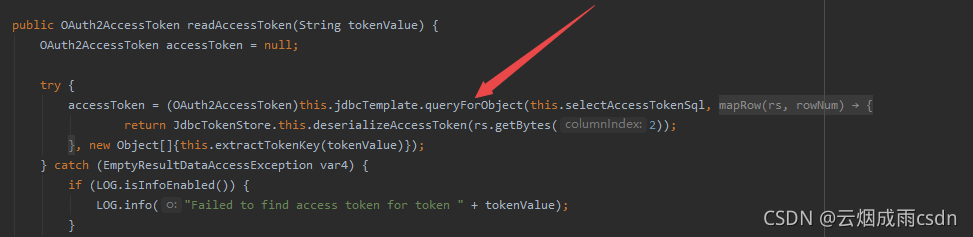
JdbcTokenStore 是采用数据库来存储,可以看到该类定义了很多 SQL 语句用来管理 Token。
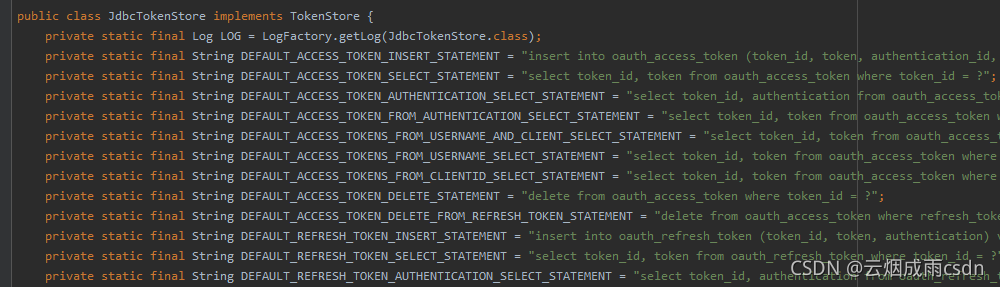
该类直接使用 spring-jdbc 提供的 JdbcTemplate 模板类进行 SQL 操作。
JdbcTokenStore 并不是一个很好的方式,因为数据库查询还是比较消耗性能的。
2. JwtTokenStore
JwtTokenStore 使用 JWT 令牌来存储,这是目前用的比较多的方式了,直接将令牌及认证信息添加到令牌中,返回一个很长的令牌给客户端,服务端不需要存储,访问时直接携带这个访问,资源服务器直接在令牌中获取认证信息。
在 DefaultTokenServices 中的 createAccessToken 方法创建 Token 的时候,最后会判断有没有令牌增强器,如果有则会调用 AccessTokenConverter 来进行增强处理,变为 JWT 令牌。

而在使用 JwtTokenStore 时,是需要注入一个 JwtAccessTokenConverter(JWT 访问令牌增强器)的:
    @Bean
    public TokenStore jwtTokenStore(JwtAccessTokenConverter jwtAccessTokenConverter) {
        return new JwtTokenStore(jwtAccessTokenConverter);
    }
    // Jwt转换器
    @Bean
    public JwtAccessTokenConverter jwtAccessTokenConverter() {
        JwtAccessTokenConverter converter = new JwtAccessTokenConverter();
        converter.setSigningKey("123456");
        return converter;
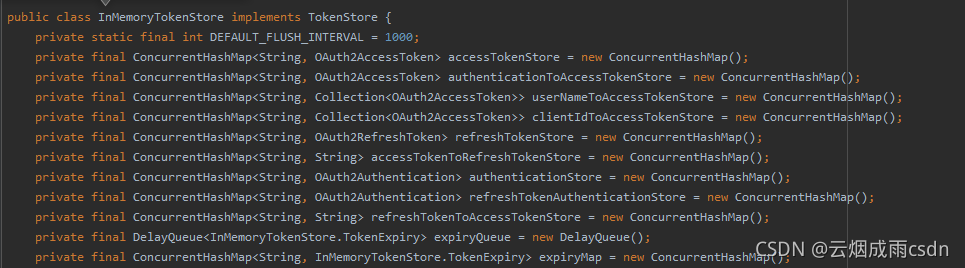
3. InMemoryTokenStore
InMemoryTokenStore 是采用内存来存储,这是默认的存储方式,可以看到其内部维护了很多 ConcurrentHashMap:
由于认证通过后,认证信息在当前授权服务器的内存中,携带令牌访问其他资源服务器的接口时,则需要配置授权服务器的地址了,然后让资源服务器远程去获取当前令牌的用户信息,所以资源服务器在使用 InMemoryTokenStore 时,就需要以下这些配置:
security:
  oauth2:
    client:
      client-id: client
      client-secret: secret
      access-token-uri: http://localhost:20000/oauth/token
      user-authorization-uri: http://localhost:20000/oauth/authorize
    resource:
      token-info-uri: http://localhost:20000/oauth/check_token
所以这种方式一般也不用。
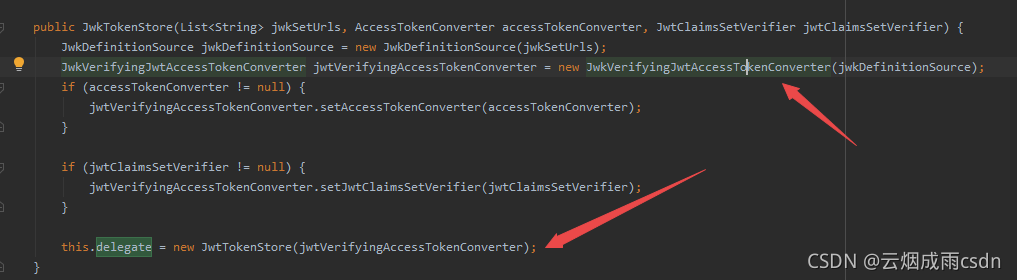
4. JwkTokenStore
Jwk 和 JWT 很像,简单来说,这里的 Jwk 就是使用了 JSON Web Signature (JWS) 的 JWT 令牌,也就是使用了在线签名的 JWT。
JwkTokenStore 的唯一责任是解码 JWT 并使用相应的 JWK 验证它的签名 (JWS)。
可以从它的构造方法看出,它实际还是一个 JwtTokenStore,只是定义了一个特殊的转换器。
5. RedisTokenStore
RedisTokenStore 是使用 Redis 来存储,首先我们看下它的成员属性:
    //  一些字符串常量
    private static final String ACCESS = "access:";
    private static final String AUTH_TO_ACCESS = "auth_to_access:";
    private static final String AUTH = "auth:";
    private static final String REFRESH_AUTH = "refresh_auth:";
    private static final String ACCESS_TO_REFRESH = "access_to_refresh:";
    private static final String REFRESH = "refresh:";
    private static final String REFRESH_TO_ACCESS = "refresh_to_access:";
    private static final String CLIENT_ID_TO_ACCESS = "client_id_to_access:";
    private static final String UNAME_TO_ACCESS = "uname_to_access:";
    private static final boolean springDataRedis_2_0 = ClassUtils.isPresent("org.springframework.data.redis.connection.RedisStandaloneConfiguration", RedisTokenStore.class.getClassLoader());
    // redis 连接工厂
    private final RedisConnectionFactory connectionFactory;
    // key生成策略
    private AuthenticationKeyGenerator authenticationKeyGenerator = new DefaultAuthenticationKeyGenerator();
    // 序列化策略
    private RedisTokenStoreSerializationStrategy serializationStrategy = new JdkSerializationStrategy();
    // 前缀
    private String prefix = "";
    private Method redisConnectionSet_2_0;
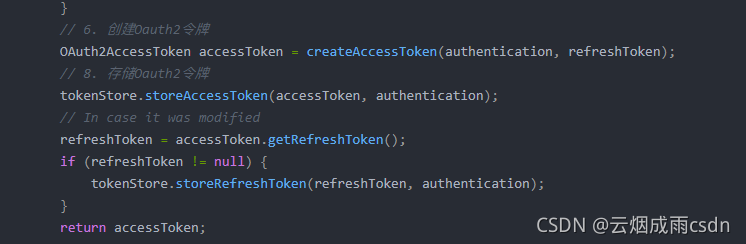
接着看下 storeAccessToken(存储访问令牌)接口是如何存入 Redis 的
// 参数token对象:包含了令牌值过期时间授权范围等信息  authentication:用户及权限信息
    @Override
    public void storeAccessToken(OAuth2AccessToken token, OAuth2Authentication authentication) {
        // 1. 序列化
        // 序列化token对象
        byte[] serializedAccessToken = serialize(token);
        // 序列化 authentication对象
        byte[] serializedAuth = serialize(authentication);
        // 序列化accessKey 格式为: prefix(前缀)+ access:fe8adf14-79d8-494f-87d5-74b6c7a608fb
        byte[] accessKey = serializeKey(ACCESS + token.getValue());
        // 序列化authKey  格式为:prefix(前缀)+ auth:fe8adf14-79d8-494f-87d5-74b6c7a608fb
        byte[] authKey = serializeKey(AUTH + token.getValue());
        // 序列化authToAccessKey  格式为:auth_to_access:287b1b4095d75bc94942ea499ad78a0c
        byte[] authToAccessKey = serializeKey(AUTH_TO_ACCESS + authenticationKeyGenerator.extractKey(authentication));
        //  序列化approvalKey 格式为:uname_to_access:client:user
        byte[] approvalKey = serializeKey(UNAME_TO_ACCESS + getApprovalKey(authentication));
        // 序列化clientId 格式为:client_id_to_access:client
        byte[] clientId = serializeKey(CLIENT_ID_TO_ACCESS + authentication.getOAuth2Request().getClientId());

        RedisConnection conn = getConnection();
        try {
            conn.openPipeline();
            if (springDataRedis_2_0) {
                try {
                    // 2. 存储Redis
                    // 存储access:fe8adf14-79d8-494f-87d5-74b6c7a608fb=》token 对象
                    this.redisConnectionSet_2_0.invoke(conn, accessKey, serializedAccessToken);
                    // 存储auth:fe8adf14-79d8-494f-87d5-74b6c7a608fb=》authentication 对象
                    this.redisConnectionSet_2_0.invoke(conn, authKey, serializedAuth);
                    // 存储auth_to_access:287b1b4095d75bc94942ea499ad78a0c=》token 对象
                    this.redisConnectionSet_2_0.invoke(conn, authToAccessKey, serializedAccessToken);
                } catch (Exception ex) {
                    throw new RuntimeException(ex);
                }
            } else {
                conn.set(accessKey, serializedAccessToken);
                conn.set(authKey, serializedAuth);
                conn.set(authToAccessKey, serializedAccessToken);
            }
            if (!authentication.isClientOnly()) {
                // 3. 存在用户信息,则 存储 uname_to_access:client:user=》token 对象
                conn.sAdd(approvalKey, serializedAccessToken);
            }
            // 存储client_id_to_access:client=》 token 对象
            conn.sAdd(clientId, serializedAccessToken);
            if (token.getExpiration() != null) {
                // 4. 设置过期时间
                int seconds = token.getExpiresIn();
                conn.expire(accessKey, seconds);
                conn.expire(authKey, seconds);
                conn.expire(authToAccessKey, seconds);
                conn.expire(clientId, seconds);
                conn.expire(approvalKey, seconds);
            }
            OAuth2RefreshToken refreshToken = token.getRefreshToken();
            // 5. 设置刷新令牌(令牌包含令牌值及过期时间)
            if (refreshToken != null && refreshToken.getValue() != null) {
                // 序列化刷新令牌(值)
                byte[] refresh = serialize(token.getRefreshToken().getValue());
                // 序列化访问令牌(值)
                byte[] auth = serialize(token.getValue());
                // 序列化刷新令牌值 refresh_to_access:117627b6-ce6f-4707-a9c6-96262779b02b
                byte[] refreshToAccessKey = serializeKey(REFRESH_TO_ACCESS + token.getRefreshToken().getValue());
                // 序列化访问令牌值 access_to_refresh:fe8adf14-79d8-494f-87d5-74b6c7a608fb
                byte[] accessToRefreshKey = serializeKey(ACCESS_TO_REFRESH + token.getValue());
                if (springDataRedis_2_0) {
                    try {
                        // 存储 refresh_to_access:117627b6-ce6f-4707-a9c6-96262779b02b=》 访问令牌值
                        this.redisConnectionSet_2_0.invoke(conn, refreshToAccessKey, auth);
                        // 存储 access_to_refresh:fe8adf14-79d8-494f-87d5-74b6c7a608fb=》 刷新令牌值
                        this.redisConnectionSet_2_0.invoke(conn, accessToRefreshKey, refresh);
                    } catch (Exception ex) {
                        throw new RuntimeException(ex);
                    }
                } else {
                    conn.set(refreshToAccessKey, auth);
                    conn.set(accessToRefreshKey, refresh);
                }
                if (refreshToken instanceof ExpiringOAuth2RefreshToken) {
                    ExpiringOAuth2RefreshToken expiringRefreshToken = (ExpiringOAuth2RefreshToken) refreshToken;
                    Date expiration = expiringRefreshToken.getExpiration();
                    // 设置过期时间
                    if (expiration != null) {
                        int seconds = Long.valueOf((expiration.getTime() - System.currentTimeMillis()) / 1000L)
                                .intValue();
                        conn.expire(refreshToAccessKey, seconds);
                        conn.expire(accessToRefreshKey, seconds);
                    }
                }
            }
            conn.closePipeline();
        } finally {
            conn.close();
        }
    }
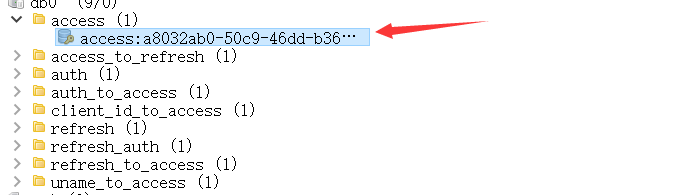
最终在 Redis 中,存储了以下数据:
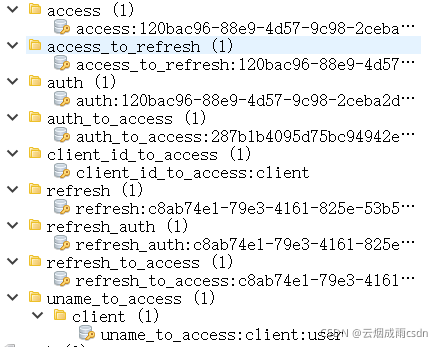
具体说明如下:
| Key | 说明 | alue |
|---|---|---|
| access:120bac96-88e9-4d57-9c98-2ceba2dab6e4 | 通过访问令牌获取令牌信息 | 访问令牌对象数据,包含令牌值,过期时间,授权范围等 |
| access_to_refresh:120bac96-88e9-4d57-9c98-2ceba2dab6e4 | 访通过访问令牌获取刷新令牌 | 刷新令牌对象 |
| auth:120bac96-88e9-4d57-9c98-2ceba2dab6e4 | 通过访问令牌获取认证信息 | authentication 对象 |
| auth_to_access:287b1b4095d75bc94942ea499ad78a0c | 通过 authentication 获取访问令牌(key 采用用户名、clientID、授权范围 MD5 加密) | 访问令牌对象 |
| client_id_to_access:client | 使用 cliend ID 获取 token 对象 | token 对象 |
| refresh:c8ab74e1-79e3-4161-825e-53b5991f8455 | 通过刷新令牌值获取刷新令牌对象 | 刷新令牌对象 |
| refresh_auth:c8ab74e1-79e3-4161-825e-53b5991f8455 | 通过刷新令牌获取 认证信息 | authentication 对象 |
| refresh_to_access:c8ab74e1-79e3-4161-825e-53b5991f8455 | 通过刷新令牌获取访问令牌 | 访问令牌对象 |
| uname_to_access:client:user | 使用 clientID 和用户名获取访问令牌 | token 对象 |
使用 RedisTokenStore
RedisTokenStore 的使用很简单,只需要集成 Redis,配置 RedisTokenStore 到容器中就可以了。
如果项目没有集成 Redis 则可以使用spring-boot-starter-data-redis,这里就不赘述了。
1. 授权服务器改造
@Configuration 配置类添加 Bean:
    @Bean
    public TokenStore jwtTokenStore(RedisConnectionFactory connectionFactory) {
        return new RedisTokenStore(connectionFactory);
    }
注入到授权服务器配置类中,并在端点配置类中添加 redisTokenStore。
@Autowired
    private TokenStore redisTokenStore;

        // 端点配置
    @Override
    public void configure(AuthorizationServerEndpointsConfigurer endpoints) throws Exception {
        // 配置端点允许的请求方式
        endpoints.allowedTokenEndpointRequestMethods(HttpMethod.GET, HttpMethod.POST);
        // 配置认证管理器
        endpoints.authenticationManager(authenticationManager);
        // 自定义异常翻译器,用于处理OAuth2Exception
        endpoints.exceptionTranslator(myWebResponseExceptionTranslator);
        // 重新组装令牌颁发者,加入自定义授权模式
        endpoints.tokenGranter(getTokenGranter(endpoints));
/*      // 添加JWT令牌
        // JWT令牌转换器
        endpoints.accessTokenConverter(jwtAccessTokenConverter);
        // Redis 存储令牌*/
        endpoints.tokenStore(redisTokenStore);
    }
2. 资源服务器改造
资源服务器则只需要在 ResourceServerConfigurerAdapter 配置类中添加 RedisTokenStore 类型的 Bean 就可以了。
    @Bean
    public TokenStore tokenStore(RedisConnectionFactory connectionFactory) {
        return new RedisTokenStore(connectionFactory);
    }
3. 测试
使用密码模式申请令牌,可以看到令牌的开头为 a80xx。
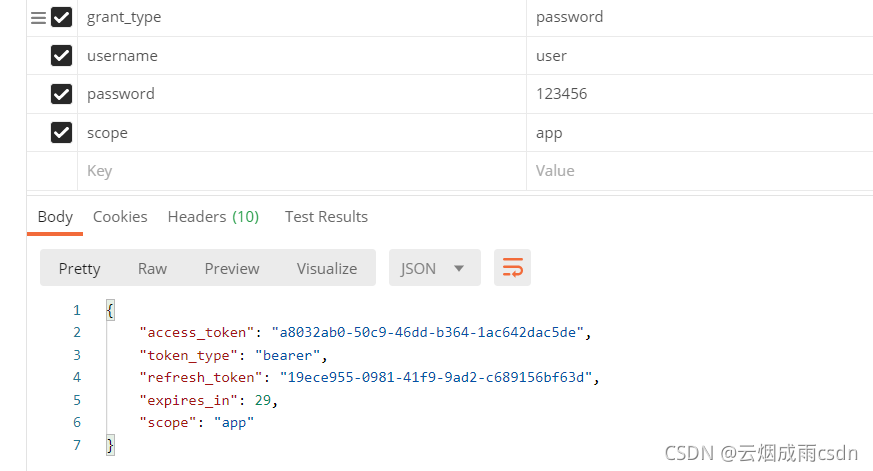
在 Redis 可以看到当前令牌的相关信息:
可以看到这些数据是有过期时间的,时间为设置令牌的过期时间,访问令牌和刷新令牌的时间是可以分别设置的,一旦过期时间到了,这些数据就会被删除。

然后使用该令牌去访问资源服务器接口,发现认证通过,集成没问题。
在带令牌访问资源服务器时,OAuth2AuthenticationProcessingFilter 就会去缓存中查询认证信息。
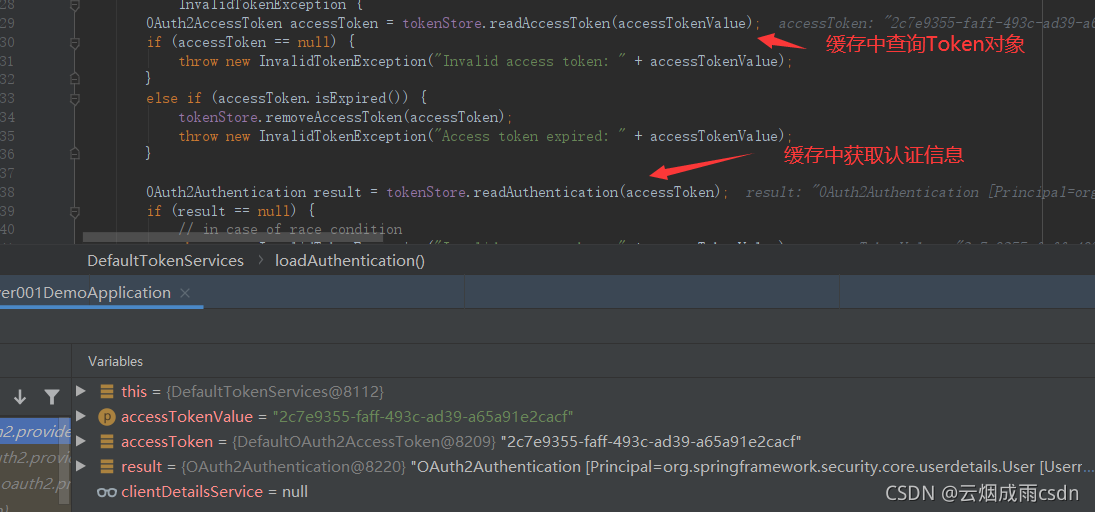
在上篇文档中,我们了解到了 Security 登录后用户信息保存在 Session 中,那么 Oauth2 中,会不会还保存 SecurityContext 在 Session 中呢?答案是否定的,因为 ResourceServer 自动配置了 NullSecurityContextRepository 存储类,也就是不会保存 Session 了,只会将 SecurityContext 设置到线程中,方便后续逻辑使用,也就是每次访问,都会去查询 Redis 中的会话信息。
 wechat
 alipay