【Spring Security】 Oauth2 授权页面
【Spring Security】 Oauth2 授权页面
Metadata
title: 【Spring Security】 Oauth2 授权页面
date: 2023-02-05 16:00
tags:
  - 行动阶段/完成
  - 主题场景/组件
  - 笔记空间/KnowladgeSpace/ProgramSpace/ModuleSpace
  - 细化主题/Module/SpringSecurity
categories:
  - SpringSecurity
keywords:
  - SpringSecurity
description: 【Spring Security】 Oauth2 授权页面
【Spring Security】 Oauth2 授权页面
之前分析了 auth_client_details 表 scope、resource_ids、authorities 这些字段,然后还有一个 autoapprove 字段,它和 scope 授权有关,接下来简单分析下。
获取授权码源码分析
http://localhost:20000/oauth/authorize?client_id=client&client_secret=secret&response_type=code
1. 进入 BasicAuthenticationFilter
和密码模式一样,首先都会进入 BasicAuthenticationFilter 过滤器对客户端进行认证。
然后经过其他过滤器,如果用户没有登录,则会调转到首页进行登录。
2. 进入 AuthorizationEndpoint
客户端及用户都认证通过后,进入到 AuthorizationEndpoint 端点,申请授权码:
    @RequestMapping(value = "/oauth/authorize")
    public ModelAndView authorize(Map<String, Object> model, @RequestParam Map<String, String> parameters,
            SessionStatus sessionStatus, Principal principal) {}
传入的参数有:
- model:页面模型数据,客户端相关信息
- parameters:请求参数
- principal:用户认证信息
/oauth/authorize端点的源码说明如下:
    @RequestMapping(value = "/oauth/authorize")
    public ModelAndView authorize(Map<String, Object> model, @RequestParam Map<String, String> parameters,
            SessionStatus sessionStatus, Principal principal) {

        // 1. 创建认证请求,包含了请求参数和客户端相关信息
        AuthorizationRequest authorizationRequest = getOAuth2RequestFactory().createAuthorizationRequest(parameters);
        // 2. 获取响应类型=》code
        Set<String> responseTypes = authorizationRequest.getResponseTypes();
        // 3. 不是token 和code,则抛出异常
        if (!responseTypes.contains("token") && !responseTypes.contains("code")) {
            throw new UnsupportedResponseTypeException("Unsupported response types: " + responseTypes);
        }
        // 4. 没有客户端 ,则抛出异常
        if (authorizationRequest.getClientId() == null) {
            throw new InvalidClientException("A client id must be provided");
        }

        try {
            // 5. 没有登录信息,抛出异常
            if (!(principal instanceof Authentication) || !((Authentication) principal).isAuthenticated()) {
                throw new InsufficientAuthenticationException(
                        "User must be authenticated with Spring Security before authorization can be completed.");
            }
            // 6. 数据库查询客户端信息
            ClientDetails client = getClientDetailsService().loadClientByClientId(authorizationRequest.getClientId());

            // 7. 获取请求参数中的redirect_uri,
            String redirectUriParameter = authorizationRequest.getRequestParameters().get(OAuth2Utils.REDIRECT_URI);
            // 8. 解析回调地址,如果数据库中没有配置redirect_uri,报错
            // 数据库中配置了,只有一个,则直接返回
            // 配置了多个,则查看请求中的是否和数据库中的匹配,不匹配则报错
            String resolvedRedirect = redirectResolver.resolveRedirect(redirectUriParameter, client);
            if (!StringUtils.hasText(resolvedRedirect)) {
                throw new RedirectMismatchException(
                        "A redirectUri must be either supplied or preconfigured in the ClientDetails");
            }
            // 9. 设置回调地址
            authorizationRequest.setRedirectUri(resolvedRedirect);

            // 10. 校验授权范围
            oauth2RequestValidator.validateScope(authorizationRequest, client);

            // 11. 检查是否授权,设置了自动授权,存储中也有,则设置scope授权成功,没有则会认为没有scope授权
            authorizationRequest = userApprovalHandler.checkForPreApproval(authorizationRequest,
                    (Authentication) principal);
            // 12. 是否scope授权了。
            boolean approved = userApprovalHandler.isApproved(authorizationRequest, (Authentication) principal);
            authorizationRequest.setApproved(approved);

            // 13. 授权了,则直接返回code
            if (authorizationRequest.isApproved()) {
                if (responseTypes.contains("token")) {
                    return getImplicitGrantResponse(authorizationRequest);
                }
                if (responseTypes.contains("code")) {
                    return new ModelAndView(getAuthorizationCodeResponse(authorizationRequest,
                            (Authentication) principal));
                }
            }

            // 14. 没有授权,创建ModelAndView 数据Model封装
            model.put(AUTHORIZATION_REQUEST_ATTR_NAME, authorizationRequest);
            model.put(ORIGINAL_AUTHORIZATION_REQUEST_ATTR_NAME, unmodifiableMap(authorizationRequest));
            // 15. 返回授权页面
            return getUserApprovalPageResponse(model, authorizationRequest, (Authentication) principal);

        }
        catch (RuntimeException e) {
            sessionStatus.setComplete();
            throw e;
        }

    }
在 checkForPreApproval 方法方法中,会对 scope 是否自动授权进行校验,然后保存相关信息。
public AuthorizationRequest checkForPreApproval(AuthorizationRequest authorizationRequest,
            Authentication userAuthentication) {

        String clientId = authorizationRequest.getClientId(); // client
        Collection<String> requestedScopes = authorizationRequest.getScope(); // scope
        Set<String> approvedScopes = new HashSet<String>();
        Set<String> validUserApprovedScopes = new HashSet<String>();
        if (clientDetailsService != null) {
            try {
                ClientDetails client = clientDetailsService.loadClientByClientId(clientId);
                // 1. 查询client 配置了自动授权的 scope
                for (String scope : requestedScopes) {
                    if (client.isAutoApprove(scope)) {
                        approvedScopes.add(scope);
                    }
                }
                // 2.  如果客户端的授权范围scope  都是自动授权的
                if (approvedScopes.containsAll(requestedScopes)) {
                    // gh-877 - if all scopes are auto approved, approvals still need to be added to the approval store.
                    Set<Approval> approvals = new HashSet<Approval>();
                    // 3.  获取 UserApprovalHandler 配置的授权过期时间,默认一个月
                    Date expiry = computeExpiry();
                    // 4.  添加客户端,用户授权,过期时间等数据
                    for (String approvedScope : approvedScopes) {
                        approvals.add(new Approval(userAuthentication.getName(), authorizationRequest.getClientId(),
                                approvedScope, expiry, ApprovalStatus.APPROVED));
                    }
                    // 5. 添加到存储中,默认是没有实现的,也就是没有持久化
                    approvalStore.addApprovals(approvals);
                    // 6. 设置已范围授权
                    authorizationRequest.setApproved(true);
                    return authorizationRequest;
                }
            }
            catch (ClientRegistrationException e) {
                logger.warn("Client registration problem prevent autoapproval check for client=" + clientId);
            }
        }

        if (logger.isDebugEnabled()) {
            StringBuilder builder = new StringBuilder("Looking up user approved authorizations for ");
            builder.append("client_id=" + clientId);
            builder.append(" and username=" + userAuthentication.getName());
            logger.debug(builder.toString());
        }
        // 7. 没有自动授权,则查询存储,设置授权,存储没有,返回没有scope授权标记
        // Find the stored approvals for that user and client
        Collection<Approval> userApprovals = approvalStore.getApprovals(userAuthentication.getName(), clientId);

        // Look at the scopes and see if they have expired
        Date today = new Date();
        for (Approval approval : userApprovals) {
            if (approval.getExpiresAt().after(today)) {
                if (approval.getStatus() == ApprovalStatus.APPROVED) {
                    validUserApprovedScopes.add(approval.getScope());
                    approvedScopes.add(approval.getScope());
                }
            }
        }

        if (logger.isDebugEnabled()) {
            logger.debug("Valid user approved/denied scopes are " + validUserApprovedScopes);
        }

        // If the requested scopes have already been acted upon by the user,
        // this request is approved
        if (validUserApprovedScopes.containsAll(requestedScopes)) {
            approvedScopes.retainAll(requestedScopes);
            // Set only the scopes that have been approved by the user
            authorizationRequest.setScope(approvedScopes);
            authorizationRequest.setApproved(true);
        }

        return authorizationRequest;

    }
3. scope 授权页面
最终因为没有自动授权,则会调转到授权页面,返回 ModelAndView 对象,其中 Model 对象包含以下数据。
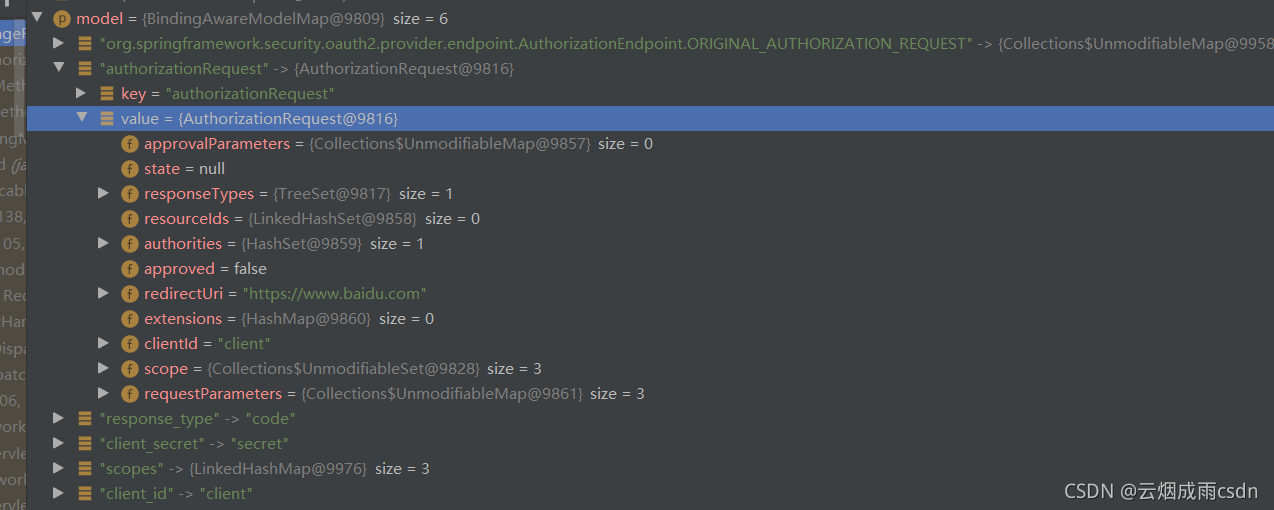
可以看到 ModelAndView,请求转发到了一个内部地址。

最终弹出了 scope 授权页面。

当我们选了则授权范围点击后,重新进入到 / oauth/authorize 端点,因为已经手动授权了,所以会进入 getAuthorizationCodeResponse 方法,进行授权码的发放。
private View getAuthorizationCodeResponse(AuthorizationRequest authorizationRequest, Authentication authUser) {
        try {
            // 1. 获取授权嘛,并重定向到回调地址
            return new RedirectView(getSuccessfulRedirect(authorizationRequest,
                    generateCode(authorizationRequest, authUser)), false, true, false);
        }
        catch (OAuth2Exception e) {
            return new RedirectView(getUnsuccessfulRedirect(authorizationRequest, e, false), false, true, false);
        }
    }
generateCode 方法,会生成一个随机的授权码,并保存到内存中。
private String generateCode(AuthorizationRequest authorizationRequest, Authentication authentication)
            throws AuthenticationException {

        try {

            OAuth2Request storedOAuth2Request = getOAuth2RequestFactory().createOAuth2Request(authorizationRequest);

            OAuth2Authentication combinedAuth = new OAuth2Authentication(storedOAuth2Request, authentication);
            // 生成授权码并保存,默认InMemoryAuthorizationCodeServices生成
            String code = authorizationCodeServices.createAuthorizationCode(combinedAuth);

            return code;

        }
        catch (OAuth2Exception e) {

            if (authorizationRequest.getState() != null) {
                e.addAdditionalInformation("state", authorizationRequest.getState());
            }

            throw e;

        }
    }
最终,浏览器重定向到回调地址,就收到了授权码了。。
应用案例
案例 1 自动授权(配置 autoapprove 为 true)
首先我们配置 autoApprove 为 true。
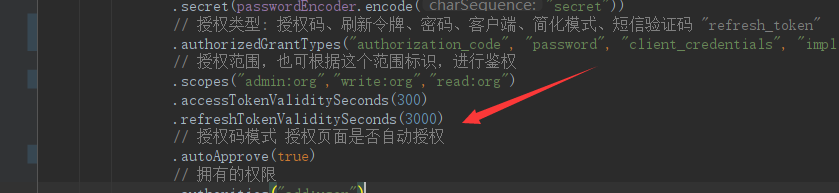
然后采用授权码进行访问,发现没有跳出授权页面,那么配置 autoapprove 为 true 时,表示会自动授权,不会弹出授权页面。

案例 2 设置自动授权范围
可以对客户端配置自动授权的范围,如果没有配置拥有的所有授权范围 ,还是会弹出授权页面。

案例 3 自定义授权页面
默认的 的页面地址是 / oauth/confirm_access ,我们可以看下默认页面是怎么写的。
@FrameworkEndpoint
@SessionAttributes("authorizationRequest")
public class WhitelabelApprovalEndpoint {

    @RequestMapping("/oauth/confirm_access")
    public ModelAndView getAccessConfirmation(Map<String, Object> model, HttpServletRequest request) throws Exception {
        final String approvalContent = createTemplate(model, request);
        if (request.getAttribute("_csrf") != null) {
            model.put("_csrf", request.getAttribute("_csrf"));
        }
        View approvalView = new View() {
            @Override
            public String getContentType() {
                return "text/html";
            }

            @Override
            public void render(Map<String, ?> model, HttpServletRequest request, HttpServletResponse response) throws Exception {
                response.setContentType(getContentType());
                response.getWriter().append(approvalContent);
            }
        };
        return new ModelAndView(approvalView, model);
    }

    protected String createTemplate(Map<String, Object> model, HttpServletRequest request) {
        AuthorizationRequest authorizationRequest = (AuthorizationRequest) model.get("authorizationRequest");
        String clientId = authorizationRequest.getClientId();

        StringBuilder builder = new StringBuilder();
        builder.append("<html><body><h1>OAuth Approval</h1>");
        builder.append("<p>Do you authorize \"").append(HtmlUtils.htmlEscape(clientId));
        builder.append("\" to access your protected resources?</p>");
        builder.append("<form id=\"confirmationForm\" name=\"confirmationForm\" action=\"");

        String requestPath = ServletUriComponentsBuilder.fromContextPath(request).build().getPath();
        if (requestPath == null) {
            requestPath = "";
        }

        builder.append(requestPath).append("/oauth/authorize\" method=\"post\">");
        builder.append("<input name=\"user_oauth_approval\" value=\"true\" type=\"hidden\"/>");

        String csrfTemplate = null;
        CsrfToken csrfToken = (CsrfToken) (model.containsKey("_csrf") ? model.get("_csrf") : request.getAttribute("_csrf"));
        if (csrfToken != null) {
            csrfTemplate = "<input type=\"hidden\" name=\"" + HtmlUtils.htmlEscape(csrfToken.getParameterName()) +
                    "\" value=\"" + HtmlUtils.htmlEscape(csrfToken.getToken()) + "\" />";
        }
        if (csrfTemplate != null) {
            builder.append(csrfTemplate);
        }

        String authorizeInputTemplate = "<label><input name=\"authorize\" value=\"Authorize\" type=\"submit\"/></label></form>";

        if (model.containsKey("scopes") || request.getAttribute("scopes") != null) {
            builder.append(createScopes(model, request));
            builder.append(authorizeInputTemplate);
        } else {
            builder.append(authorizeInputTemplate);
            builder.append("<form id=\"denialForm\" name=\"denialForm\" action=\"");
            builder.append(requestPath).append("/oauth/authorize\" method=\"post\">");
            builder.append("<input name=\"user_oauth_approval\" value=\"false\" type=\"hidden\"/>");
            if (csrfTemplate != null) {
                builder.append(csrfTemplate);
            }
            builder.append("<label><input name=\"deny\" value=\"Deny\" type=\"submit\"/></label></form>");
        }

        builder.append("</body></html>");

        return builder.toString();
    }

    private CharSequence createScopes(Map<String, Object> model, HttpServletRequest request) {
        StringBuilder builder = new StringBuilder("<ul>");
        @SuppressWarnings("unchecked")
        Map<String, String> scopes = (Map<String, String>) (model.containsKey("scopes") ?
                model.get("scopes") : request.getAttribute("scopes"));
        for (String scope : scopes.keySet()) {
            String approved = "true".equals(scopes.get(scope)) ? " checked" : "";
            String denied = !"true".equals(scopes.get(scope)) ? " checked" : "";
            scope = HtmlUtils.htmlEscape(scope);

            builder.append("<li><div class=\"form-group\">");
            builder.append(scope).append(": <input type=\"radio\" name=\"");
            builder.append(scope).append("\" value=\"true\"").append(approved).append(">Approve</input> ");
            builder.append("<input type=\"radio\" name=\"").append(scope).append("\" value=\"false\"");
            builder.append(denied).append(">Deny</input></div></li>");
        }
        builder.append("</ul>");
        return builder.toString();
    }
}
我们则只需要自己定义一个oauth/confirm_access,覆盖掉原来的就可以了。
@Controller
@SessionAttributes("authorizationRequest")
public class PearlApprovalEndpoint {

    @RequestMapping(value = "/oauth/confirm_access", produces = "text/html;charset=UTF-8")
    public ModelAndView getAccessConfirmation(Map<String, Object> model, HttpServletRequest request) throws Exception {
        final String approvalContent = createTemplate(model, request);
        if (request.getAttribute("_csrf") != null) {
            model.put("_csrf", request.getAttribute("_csrf"));
        }
        View approvalView = new View() {
            @Override
            public String getContentType() {
                return "text/html;charset=utf-8";
            }

            @Override
            public void render(Map<String, ?> model, HttpServletRequest request, HttpServletResponse response) throws Exception {
                response.setContentType(getContentType());
                response.getWriter().append(approvalContent);
            }
        };
        return new ModelAndView(approvalView, model);
    }

    protected String createTemplate(Map<String, Object> model, HttpServletRequest request) {
        AuthorizationRequest authorizationRequest = (AuthorizationRequest) model.get("authorizationRequest");
        String clientId = authorizationRequest.getClientId();

        StringBuilder builder = new StringBuilder();
        builder.append("<html><body><h1>OAuth 授权</h1>");
        builder.append("<p>是否允许当前网站 \"").append(HtmlUtils.htmlEscape(clientId));
        builder.append("\" 访问受保护的资源 ?</p>");
        builder.append("<form id=\"confirmationForm\" name=\"confirmationForm\" action=\"");

        String requestPath = ServletUriComponentsBuilder.fromContextPath(request).build().getPath();
        if (requestPath == null) {
            requestPath = "";
        }

        builder.append(requestPath).append("/oauth/authorize\" method=\"post\">");
        builder.append("<input name=\"user_oauth_approval\" value=\"true\" type=\"hidden\"/>");

        String csrfTemplate = null;
        CsrfToken csrfToken = (CsrfToken) (model.containsKey("_csrf") ? model.get("_csrf") : request.getAttribute("_csrf"));
        if (csrfToken != null) {
            csrfTemplate = "<input type=\"hidden\" name=\"" + HtmlUtils.htmlEscape(csrfToken.getParameterName()) +
                    "\" value=\"" + HtmlUtils.htmlEscape(csrfToken.getToken()) + "\" />";
        }
        if (csrfTemplate != null) {
            builder.append(csrfTemplate);
        }

        String authorizeInputTemplate = "<label><input name=\"authorize\" value=\"点击授权\" type=\"submit\"/></label></form>";

        if (model.containsKey("scopes") || request.getAttribute("scopes") != null) {
            builder.append(createScopes(model, request));
            builder.append(authorizeInputTemplate);
        } else {
            builder.append(authorizeInputTemplate);
            builder.append("<form id=\"denialForm\" name=\"denialForm\" action=\"");
            builder.append(requestPath).append("/oauth/authorize\" method=\"post\">");
            builder.append("<input name=\"user_oauth_approval\" value=\"false\" type=\"hidden\"/>");
            if (csrfTemplate != null) {
                builder.append(csrfTemplate);
            }
            builder.append("<label><input name=\"deny\" value=\"拒绝\" type=\"submit\"/></label></form>");
        }

        builder.append("</body></html>");

        return builder.toString();
    }

    private CharSequence createScopes(Map<String, Object> model, HttpServletRequest request) {
        StringBuilder builder = new StringBuilder("<ul>");
        @SuppressWarnings("unchecked")
        Map<String, String> scopes = (Map<String, String>) (model.containsKey("scopes") ?
                model.get("scopes") : request.getAttribute("scopes"));
        for (String scope : scopes.keySet()) {
            String approved = "true".equals(scopes.get(scope)) ? " checked" : "";
            String denied = !"true".equals(scopes.get(scope)) ? " checked" : "";
            scope = HtmlUtils.htmlEscape(scope);

            builder.append("<li><div class=\"form-group\">");
            builder.append(scope).append(": <input type=\"radio\" name=\"");
            builder.append(scope).append("\" value=\"true\"").append(approved).append(">授权访问</input> ");
            builder.append("<input type=\"radio\" name=\"").append(scope).append("\" value=\"false\"");
            builder.append(denied).append(">拒绝</input></div></li>");
        }
        builder.append("</ul>");
        return builder.toString();
    }
}
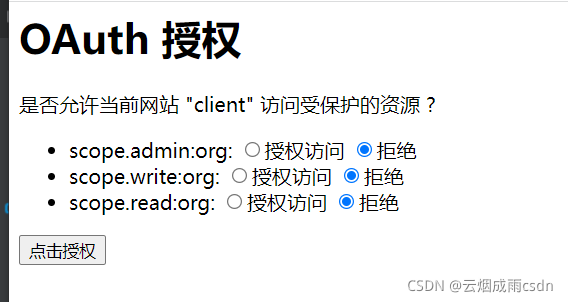
可以看到授权页面变成了我们自定义的:
 wechat
 alipay