【Spring Security】 授权 流程分析
【Spring Security】 授权 流程分析
Metadata
title: 【Spring Security】 授权 流程分析
date: 2023-02-02 14:36
tags:
  - 行动阶段/完成
  - 主题场景/组件
  - 笔记空间/KnowladgeSpace/ProgramSpace/ModuleSpace
  - 细化主题/Module/SpringSecurity
categories:
  - SpringSecurity
keywords:
  - SpringSecurity
description: 【Spring Security】 授权 流程分析
【Spring Security】 授权 流程分析
1. 进入 ExceptionTranslationFilter
首先会进入 ExceptionTranslationFilter 的 doFilter 方法,之前说过这个过滤器的主要作用是拦截异常并处理。
private void doFilter(HttpServletRequest request, HttpServletResponse response, FilterChain chain)
            throws IOException, ServletException {
        try {
            // 1. 请求直接放行
            chain.doFilter(request, response);
        } catch (IOException ex) {
            throw ex;
        } catch (Exception ex) {
            // Try to extract a SpringSecurityException from the stacktrace
            // 2. 捕获后续出现的异常
            Throwable[] causeChain = this.throwableAnalyzer.determineCauseChain(ex);
            RuntimeException securityException = (AuthenticationException) this.throwableAnalyzer
                    .getFirstThrowableOfType(AuthenticationException.class, causeChain);
            if (securityException == null) {
                securityException = (AccessDeniedException) this.throwableAnalyzer
                        .getFirstThrowableOfType(AccessDeniedException.class, causeChain);
            }
            if (securityException == null) {
                rethrow(ex);
            }
            if (response.isCommitted()) {
                throw new ServletException("Unable to handle the Spring Security Exception "
                        + "because the response is already committed.", ex);
            }
            // 3. 处理发生的异常
            handleSpringSecurityException(request, response, chain, securityException);
        }
    }
2. 进入 FilterSecurityInterceptor
接下来进入 FilterSecurityInterceptor 过滤器,他的 doFilter 方法,调用的是自身的 invoke(FilterInvocation filterInvocation) 方法。该方法完成了整个访问控制逻辑。
    /**
     *  doFilter实际执行的方法
     * @param filterInvocation 封装了request response 过滤器链的对象
     */
    public void invoke(FilterInvocation filterInvocation) throws IOException, ServletException {
        // 1. 如果已经执行过该过滤器,直接放行
        if (isApplied(filterInvocation) && this.observeOncePerRequest) {
            // filter already applied to this request and user wants us to observe
            // once-per-request handling, so don't re-do security checking
            filterInvocation.getChain().doFilter(filterInvocation.getRequest(), filterInvocation.getResponse());
            return;
        }
        // first time this request being called, so perform security checking
        // 2. 第一次调用这个请求,所以执行安全检查
        if (filterInvocation.getRequest() != null && this.observeOncePerRequest) {
            // 3. 在request中添加__spring_security_filterSecurityInterceptor_filterApplied = true,表示执行了该过滤器
            filterInvocation.getRequest().setAttribute(FILTER_APPLIED, Boolean.TRUE);
        }
        // 4. 前置访问控制处理
        InterceptorStatusToken token = super.beforeInvocation(filterInvocation);
        try {
            // 5. 放行		filterInvocation.getChain().doFilter(filterInvocation.getRequest(), filterInvocation.getResponse());
        } finally {
            super.finallyInvocation(token);
        }
        // 6. 后置处理
        super.afterInvocation(token, null);
    }
3. 进入 AbstractSecurityInterceptor
在 FilterSecurityInterceptor 中,会调用父类的 beforeInvocation(filterInvocation) 方法进行处理,最终返回一个 InterceptorStatusToken 对象,它就是 spring security 处理鉴权的入口。
protected InterceptorStatusToken beforeInvocation(Object object) {
        Assert.notNull(object, "Object was null");
        // 1. 判断object是不是FilterInvocation
        if (!getSecureObjectClass().isAssignableFrom(object.getClass())) {
            throw new IllegalArgumentException("Security invocation attempted for object " + object.getClass().getName()
                    + " but AbstractSecurityInterceptor only configured to support secure objects of type: "
                    + getSecureObjectClass());
        }
        // 2. 获取配置的访问控制规则 any request =》authenticated ,没有配置,return null
        Collection<ConfigAttribute> attributes = this.obtainSecurityMetadataSource().getAttributes(object);
        if (CollectionUtils.isEmpty(attributes)) {
            Assert.isTrue(!this.rejectPublicInvocations,
                    () -> "Secure object invocation " + object
                            + " was denied as public invocations are not allowed via this interceptor. "
                            + "This indicates a configuration error because the "
                            + "rejectPublicInvocations property is set to 'true'");
            if (this.logger.isDebugEnabled()) {
                this.logger.debug(LogMessage.format("Authorized public object %s", object));
            }
            publishEvent(new PublicInvocationEvent(object));
            return null; // no further work post-invocation
        }
        // 3. 判断认证对象Authentication是否为null
        if (SecurityContextHolder.getContext().getAuthentication() == null) {
            credentialsNotFound(this.messages.getMessage("AbstractSecurityInterceptor.authenticationNotFound",
                    "An Authentication object was not found in the SecurityContext"), object, attributes);
        }
        // 4. 获取Authentication对象
        Authentication authenticated = authenticateIfRequired();
        if (this.logger.isTraceEnabled()) {
            this.logger.trace(LogMessage.format("Authorizing %s with attributes %s", object, attributes));
        }
        // Attempt authorization
        // 5. 进行授权判断
        attemptAuthorization(object, attributes, authenticated);
        if (this.logger.isDebugEnabled()) {
            this.logger.debug(LogMessage.format("Authorized %s with attributes %s", object, attributes));
        }
        // 6. 发布授权成功
        if (this.publishAuthorizationSuccess) {
            publishEvent(new AuthorizedEvent(object, attributes, authenticated));
        }

        // Attempt to run as a different user
        // 7. 对Authentication进行再处理,这里没有处理,直接返回null
        Authentication runAs = this.runAsManager.buildRunAs(authenticated, object, attributes);
        if (runAs != null) {
            SecurityContext origCtx = SecurityContextHolder.getContext();
            SecurityContextHolder.setContext(SecurityContextHolder.createEmptyContext());
            SecurityContextHolder.getContext().setAuthentication(runAs);

            if (this.logger.isDebugEnabled()) {
                this.logger.debug(LogMessage.format("Switched to RunAs authentication %s", runAs));
            }
            // need to revert to token.Authenticated post-invocation
            return new InterceptorStatusToken(origCtx, true, attributes, object);
        }
        this.logger.trace("Did not switch RunAs authentication since RunAsManager returned null");
        // no further work post-invocation
        // 8. 返回InterceptorStatusToken
        return new InterceptorStatusToken(SecurityContextHolder.getContext(), false, attributes, object);

    }
在 beforeInvocation 方法中的核心方法为 attemptAuthorization,它会调用授权管理器进行决策,当失败发生异常时,会爆出异常。
    /**
     * 授权判断
     *
     * @param object        filter invocation [GET /test]
     * @param attributes 配置的URL放行、需要验证路径等配置
     * @param authenticated 认证对象
     */
    private void attemptAuthorization(Object object, Collection<ConfigAttribute> attributes,
            Authentication authenticated) {
        try {
            // 1. 调用授权管理器进行决策
            this.accessDecisionManager.decide(authenticated, object, attributes);
        } catch (AccessDeniedException ex) {
            // 2. 访问被拒绝。抛出AccessDeniedException异常
            if (this.logger.isTraceEnabled()) {
                this.logger.trace(LogMessage.format("Failed to authorize %s with attributes %s using %s", object,
                        attributes, this.accessDecisionManager));
            } else if (this.logger.isDebugEnabled()) {
                this.logger.debug(LogMessage.format("Failed to authorize %s with attributes %s", object, attributes));
            }
            // 3. 发布授权失败事件
            publishEvent(new AuthorizationFailureEvent(object, attributes, authenticated, ex));
            throw ex;
        }
    }
4. 决策者进行投票
调用授权管理器进行决策,会进入默认的决策器 AffirmativeBased,上面说过它的投票机制,这里获取到的选民只有一个。

循环投票者,并开始计票。
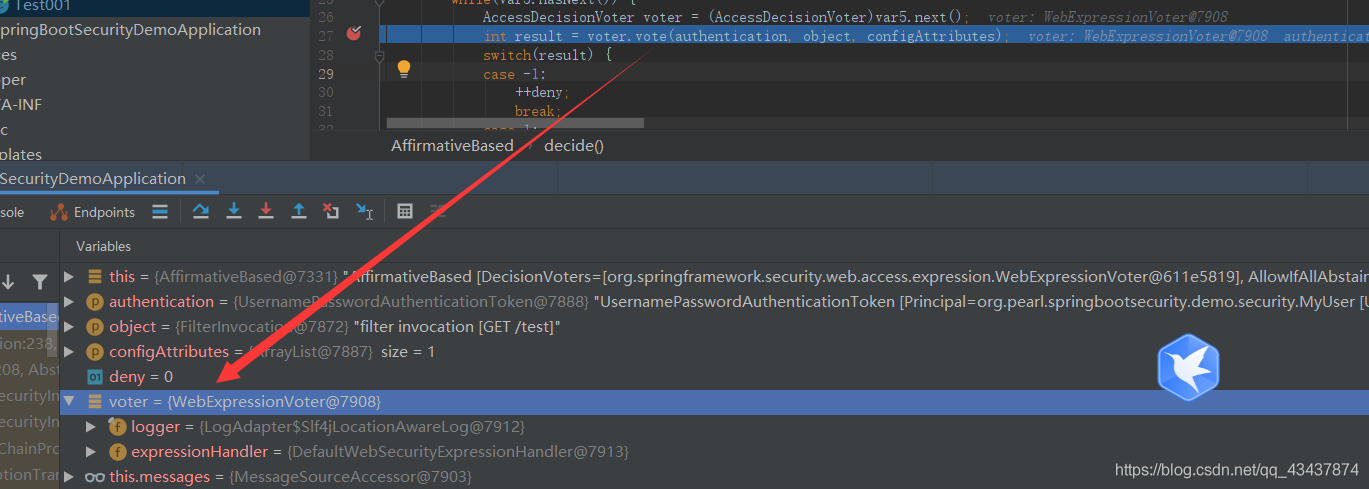
5. 开始投票
进入 WebExpressionVoter 的 vote 方法开始投票。
    // 投票
    @Override
    public int vote(Authentication authentication, FilterInvocation filterInvocation,
            Collection<ConfigAttribute> attributes) {
        // 1. 校验参数
        Assert.notNull(authentication, "authentication must not be null");
        Assert.notNull(filterInvocation, "filterInvocation must not be null");
        Assert.notNull(attributes, "attributes must not be null");
        // 2. 获取http配置项
        WebExpressionConfigAttribute webExpressionConfigAttribute = findConfigAttribute(attributes);
        // 3. 没有配置规则,弃权
        if (webExpressionConfigAttribute == null) {
            this.logger
                    .trace("Abstained since did not find a config attribute of instance WebExpressionConfigAttribute");
            return ACCESS_ABSTAIN;
        }
        // 4. 对EL表达式进行处理
        EvaluationContext ctx = webExpressionConfigAttribute.postProcess(
                this.expressionHandler.createEvaluationContext(authentication, filterInvocation), filterInvocation);
        boolean granted = ExpressionUtils.evaluateAsBoolean(webExpressionConfigAttribute.getAuthorizeExpression(), ctx);
        if (granted) {
            // 5. 符合条件,赞成票
            return ACCESS_GRANTED;
        }
        this.logger.trace("Voted to deny authorization");
        // 6. 最后都没有则反对票
        return ACCESS_DENIED;
    }
6. 对表达式进行处理
投票中的核心代码为:
EvaluationContext ctx = webExpressionConfigAttribute.postProcess(this.expressionHandler.createEvaluationContext(authentication, filterInvocation), filterInvocation);
            boolean granted = ExpressionUtils.evaluateAsBoolean(webExpressionConfigAttribute.getAuthorizeExpression(), ctx);
首先会创建 EL 表达式的上下文。
this.expressionHandler.createEvaluationContext(authentication, filterInvocation)
然后调用 ExpressionUtils 工具类对 EL 表达式进行处理,最终调用的是 SpelExpression 中的 getValue 方法。
第一次是对配置类中的规则进行校验,这里是 anyRequest()).authenticated(),因为登录了,所以这个投票是通过的。
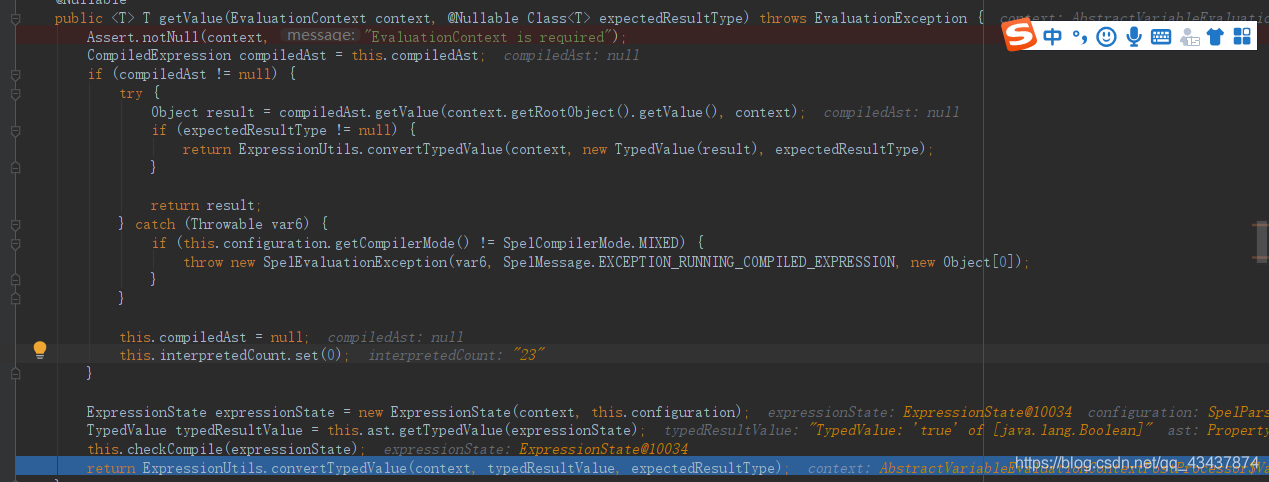
第二次是对我们配置了权限注解的方法进行校验。
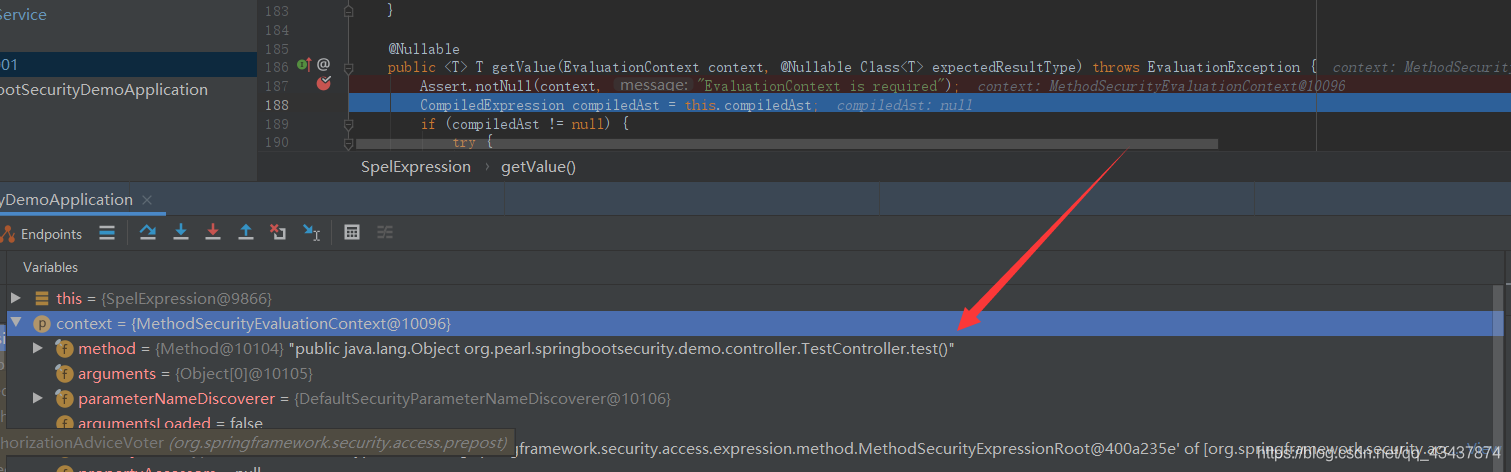
会首先获取到我们请求方法上的 EL 表达式,然后进行配置校验,涉及到 EL 的相关知识,这里后续介绍。
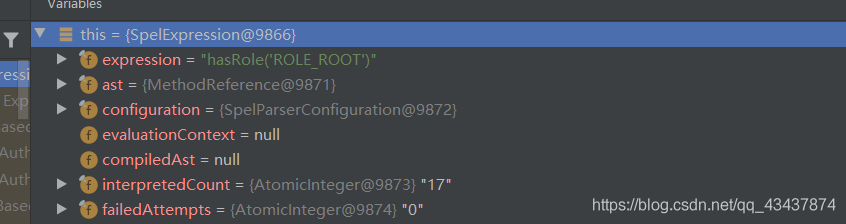
表达式检验之后,这个当前用户有这个角色,所以投票通过,加下来就要进行授权成功处理了。
7. 授权成功处理
没有抛出异常,则认为授权通过,FilterSecurityInterceptor 会进入 finallyInvocation 方法。这个方法主要是判断需不需要重新设置 SecurityContext 内容,这里没有配置,直接跳过。
protected void finallyInvocation(InterceptorStatusToken token) {
        if (token != null && token.isContextHolderRefreshRequired()) {
            SecurityContextHolder.setContext(token.getSecurityContext());
            if (this.logger.isDebugEnabled()) {
                this.logger.debug(LogMessage.of(() -> {
                    return "Reverted to original authentication " + token.getSecurityContext().getAuthentication();
                }));
            }
        }
    }
接下来进入后置处理 afterInvocation 方法,再次调用了 finallyInvocation 方法,然后查询是否还有决策后置处理器,如果有,再次进行决策。最后的最后,才代表授权成功,就交由 Spring MVC , 访问到我们的 controller 方法了。
protected Object afterInvocation(InterceptorStatusToken token, Object returnedObject) {
        if (token == null) {
            return returnedObject;
        } else {
            this.finallyInvocation(token);
            if (this.afterInvocationManager != null) {
                try {
                    returnedObject = this.afterInvocationManager.decide(token.getSecurityContext().getAuthentication(), token.getSecureObject(), token.getAttributes(), returnedObject);
                } catch (AccessDeniedException var4) {
                    this.publishEvent(new AuthorizationFailureEvent(token.getSecureObject(), token.getAttributes(), token.getSecurityContext().getAuthentication(), var4));
                    throw var4;
                }
            }
            return returnedObject;
        }
    }
 wechat
 alipay